Assignment submission time is always stressful for students. There are the well-known issues that students face of decoding assignment briefs, managing multiple assignments, plus all the work that goes into completing assignments, getting the quotes and references right, and then the anxious wait to get the marks and feedback.
However, one potentially stressful stage that sometimes gets overlooked is the process of actually submitting the assignment. While this might seem like a minor stage in the process, it is a very important one, and is something that some students do struggle with, especially if it’s their first assignment, or uses a new/unfamiliar submission process, e.g., a video assessment. Additionally, and contrary to the popular myth, young people are not ‘digital natives.’ Many students come to university with low levels of digital ability and confidence, and for a lot of our students NILE will be the first VLE they’ve ever encountered, and the process of electronic assignment submission will be entirely new to them.
An excellent way to pre-emptively de-stress the assignment submission process is to adopt the view that it’s best to teach your students how to do all the things that you want them to do, including how to submit an assignment, and that’s exactly what the ITT (Initial Teacher Training) team do. In this guest post, Helen Tiplady, Senior Lecturer in Education (ITT Science), shares her approach to supporting students with the assignment submission process.
Here’s Helen:
Supporting students to submit their digital assessments correctly.
It may be due to our Primary school training backgrounds, but tutors in the Initial Teacher Training (ITT) team often share ‘What A Good One Looks Like’ with our students – otherwise fondly known as a ‘WAGOLL’.
One example I’d like to share with you was from a Level 4 science module (ITT1042) where students needed to complete a digital assessment piece. The premise was that they were planning a talk to a group of governors or sharing ideas at a staff INSET training day. The students needed to create a PowerPoint presentation along with their ‘speech’ written in the notes section. They then converted this to a PDF and uploaded this to the Turnitin submission point.
Although we have detailed, ‘step-by-step’ notes accompanied with screenshots for the students to follow as part of our assignment guidance, we have found that the most effective way for our students to upload their digital assessments correctly is through practice.
We offer a bespoke time during one of our learning events when students can observe the tutors demonstrate the steps to a successful submission (See Figure 1 below). We then ask the students individually to do a draft submission while the tutors are available to support and help with any issues. Finally, we ask the students to ‘teach each other’ on how to upload their assessment correctly to Turnitin.
This final step is crucial as this will allow the students to recall the steps more successfully at a later date. After all, Confucius is famous for saying “I hear, I forget. I see, I remember. I do and I understand.”
| Step 1 – Model: Show the students the stages to submit their digital assessment correctly. |
| Step 2 – Practice: Let the students submit a draft submission. |
| Step 3 – Tell: Ask the students to tell someone the stages they have learnt. |
Figure 1: How to support students to upload digital assessments successfully
So, in summary, try and find some ring-fenced time in one of your classes for the students to do a trial run of submitting their digital assessments. Find a time when the stakes are low and there is no pressure of a looming deadline. And remember, the more the students feel prepared, the easier they will find it to submit their digital assessments correctly the first time.
Dr Cleo Cameron (Senior Lecturer in Criminal Justice)
In this blog post, Dr Cleo Cameron reflects on the AI Design Assistant tool which was introduced into NILE Ultra courses in December 2023. More information about the tool is available here: Learning Technology Website – AI Design Assistant
Course structure tool
I used the guide prepared by the University’s Learning Technology Team (AI Design Assistant) to help me use this new AI functionality in Blackboard Ultra courses. The guide is easy to follow with useful steps and images to help the user make sense of how to deploy the new tools. Pointing out that AI-generated content may not always be factual and will require assessment and evaluation by academic staff before the material is used is an important point, and well made in the guide.
The course structure tool on first use is impressive. I used the key word ‘cybercrime’ and chose four learning modules with ‘topic’ as the heading and selected a high level of complexity. The learning modules topic headings and descriptions were indicative of exactly the material I would include for a short module.
I tried this again for fifteen learning modules (which would be the length of a semester course) and used the description, ‘Cybercrime what is it, how is it investigated, what are the challenges?’ This was less useful, and generated module topics that would not be included on the cybercrime module I deliver, such as ‘Cyber Insurance’ and a repeat of both ‘Cybercrime, laws and legislation’ and ‘Ethical and legal Implications of cybercrimes. So, on a smaller scale, I found it useful to generate ideas, but on a larger semesterised modular scale, unless more description is entered, it does not seem to be quite as beneficial. The auto-generated learning module images for the topic areas are very good for the most part though.
AI & Unsplash images
Once again, I used the very helpful LearnTech guide to use this functionality. To add a course banner, I selected Unsplash and used ‘cybercrime’ as a search term. The Unsplash images were excellent, but the scale was not always great for course banners. The first image I used could not get the sense of a keyboard and padlock, however, the second image I tried was more successful, and it displayed well as the course tile and banner on the course. Again, the tool is easy to use, and has some great content.
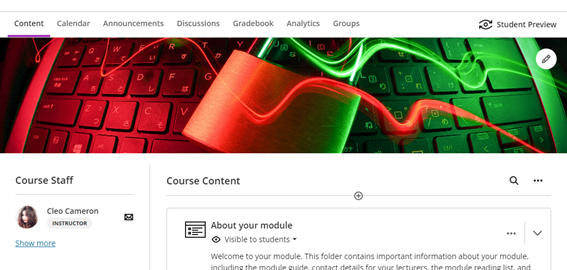
I also tried the AI image generator, using ‘cybercrime’ as a search term/keyword. The first set of images generated were not great and did not seem to bear any relation to the keyword, so I tried generating a second time and this was better. I then used the specific terms ‘cyber fraud’ and ‘cyber-enabled fraud’, and the results were not very good at all – I tried generating three times. I tried the same with ‘romance fraud’, and again, the selection was not indicative of the keywords. The AI generated attempt at romance fraud was better, although the picture definition was not very good.
Test question generation
The LearnTech guide informed the process again, although having used the functionality on the other tools, this was similar. The test question generation tool was very good – I used the term ‘What is cybercrime?’ and selected ‘Inspire me’ for five questions, with the level of complexity set to around 75%. The test that was generated was three matching questions to describe/explain cybercrime terminologies, one multiple choice question and a short answer text-based question. Each question was factually correct, with no errors. Maybe simplifying some of the language would be helpful, and also there were a couple of matched questions/answers which haven’t been covered in the usual topic material I use. But this tool was extremely useful and could save a lot of time for staff users, providing an effective knowledge check for students.
Question bank generation from Ultra documents.
By the time I tried out this tool I was familiar with the AI Design Assistant and I didn’t need to use the LearnTech guide for this one. I auto-generated four questions, set the complexity to 75%, and chose ‘Inspire me’ for question types. There were two fill-in-the-blanks, an essay question, and a true/false question which populated the question bank – all were useful and correct. What I didn’t know was how to use the questions that were saved to the Ultra question bank within a new or existing test, and this is where the LearnTech guide was invaluable with its ‘Reuse question’ in the test dropdown guidance. I tested this process and added two questions from the bank to an existing test.
Rubric generation
This tool was easily navigable, and I didn’t require the guide for this one, but the tool itself, on first use, is less effective than the others in that it took my description word for word without a different interpretation. I used the following description, with six rows and the rubric type set to ‘points range’:
‘Demonstrate knowledge and understanding of cybercrime, technologies used, methodologies employed by cybercriminals, investigations and investigative strategies, the social, ethical and legal implications of cybercrime and digital evidence collection. Harvard referencing and writing skills.’
I then changed the description to:
‘Demonstrate knowledge and understanding of cybercrime, technologies used, methodologies employed by cybercriminals, investigations and investigative strategies. Analyse and evaluate the social, ethical and legal implications of cybercrime and digital evidence collection. Demonstrate application of criminological theories. Demonstrate use of accurate UON Harvard referencing. Demonstrate effective written communication skills.’
At first generation, it only generated five of the six required rows. I tried again and it generated the same thing with only five rows, even though six was selected. It did not seem to want to separate out the knowledge and understanding of investigations and investigative strategies into its own row.
I definitely had to be much more specific with this tool than with the other AI tools I used. It saved time in that I did not have to manually fill in the points descriptions and point ranges myself, but I found that I did have to be very specific about what I wanted in the learning outcome rubric rows with the description.
Journal and discussion board prompts
This tool is very easy to deploy and actually generates some very useful results. I kept the description relatively simple and used some text from the course definition of hacking:
‘What is hacking? Hacking involves the break-in or intrusion into a networked system. Although hacking is a term that applies to cyber networks, networks have existed since the early 1900s. Individuals who attempted to break-in to the first electronic communication systems to make free long distance phonecalls were known as phreakers; those who were able to break-in to or compromise a network’s security were known as crackers. Today’s crackers are hackers who are able to “crack” into networked systems by cracking passwords (see Cross et al., 2008, p. 44).’
I used the ‘Inspire me’ cognitive level, set the complexity level to 75%, and checked the option to generate discussion titles. Three questions were generated that cover three cognitive processes:
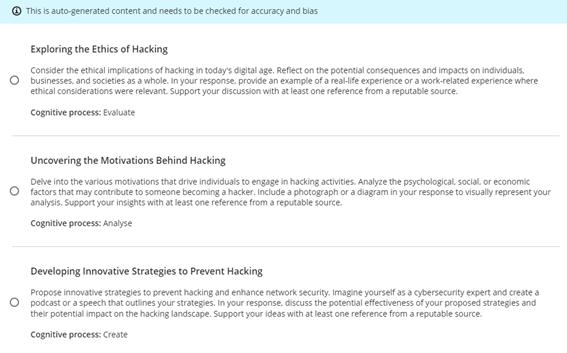
The second question was the most relevant to this area of the existing course, the other two slightly more advanced and students would not have covered this material (nor have work related experience in this area). I decided to lower the complexity level to see what would be generated on a second run:
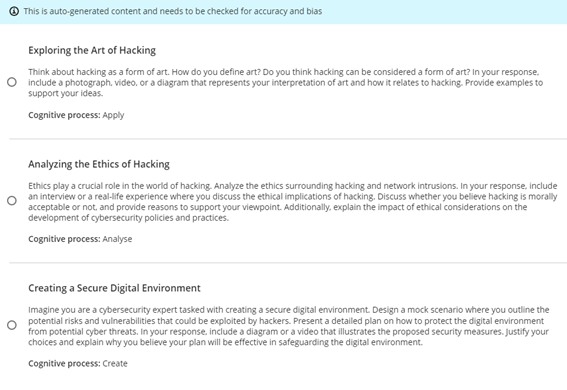
Again, the second question – to analyse – seemed the most relevant to the more theory-based cybercrime course than the other two questions. I tried again and lowered the complexity level to 25%. This time two of the questions were more relevant to the students’ knowledge and ability for where this material appears in the course (i.e., in the first few weeks):
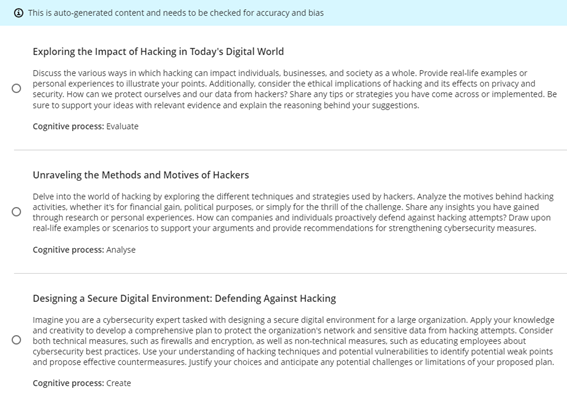
It was easy to add the selected question to the Ultra discussion.
I also tested the journal prompts and this was a more successful generation first time around. The text I used was:
‘“Government and industry hire white and gray hats who want to have their fun legally, which can defuse part of the threat”, Ruiu said, “…Many hackers are willing to help the government, particularly in fighting terrorism. Loveless said that after the 2001 terrorist attacks, several individuals approached him to offer their services in fighting Al Qaeda.” (in Arnone, 2005, 19(2)).’
I used the cognitive level ‘Inspire me’ once again and ‘generate journal title’ and this time placed complexity half-way. All three questions generated were relevant and usable.
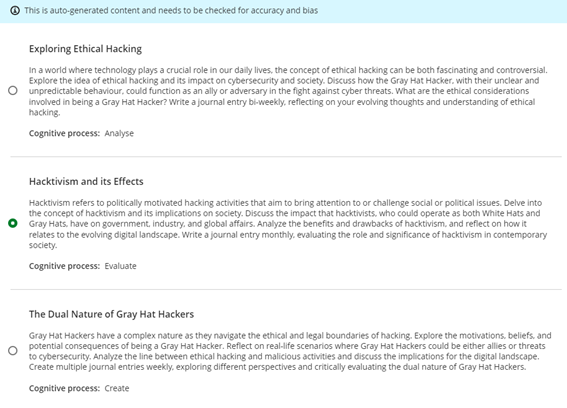
My only issue with both the discussion and journal prompts is that I could not find a way to save all of the generated questions – it would only allow me to select one, so I could not save all the prompts for possible reuse at a later date. Other than this issue, the functionality and usability and relevance of the auto-generated discussion and journal prompt, was very good.
The NILE design standards for the 2021/22 academic year were approved at the Student Support Forum meeting on the 15th of April 2021, and have now been published.
The most significant change to NILE design standards for 2021/22 is the inclusion of the design standards for Ultra courses (see, ‘Section B, Tables 5.1, 5.2 and 5.3’).
The design standards for Original courses remain largely unchanged. The only changes of note from the previous year’s standards are:
- Clarification that, should staff wish to, it is fine to update the course landing page from ‘About this module’ to ‘Announcements’ after the first few weeks of teaching (see, ‘Section C, Table 6, About this module [Entry Point*]’.
- Renaming ‘Virtual classroom’ to ‘Blackboard Collaborate’ and having this area available by default (see, ‘Section C, Table 6, Blackboard Collaborate’).
- Removal of the ABL definition from the landing page on programme-level courses (see, ‘Section C, Table 7, My Programme [Entry Point’].
The NILE design standards for 2021/22 are available to view at:
https://libguides.northampton.ac.uk/learntech/staff/nile-design/nile-design-standards
As Faculty Lead for Interprofessional Education in the Faculty of Health, Education and Society, I needed to create a resource that students could engage with on day two of their programmes – meaning it had to be user-friendly and accessible to students with a range of IT skills. Having previously tried NILE, I found that this was far too early to introduce it as a synchronous learning tool as students were unfamiliar with the VLE and its tools for working collaboratively. When discussing my dilemma with Rob Howe, he suggested I try Bootstrap xerte and set up a meeting with Anne Misselbrook as the University’s ‘guru’!
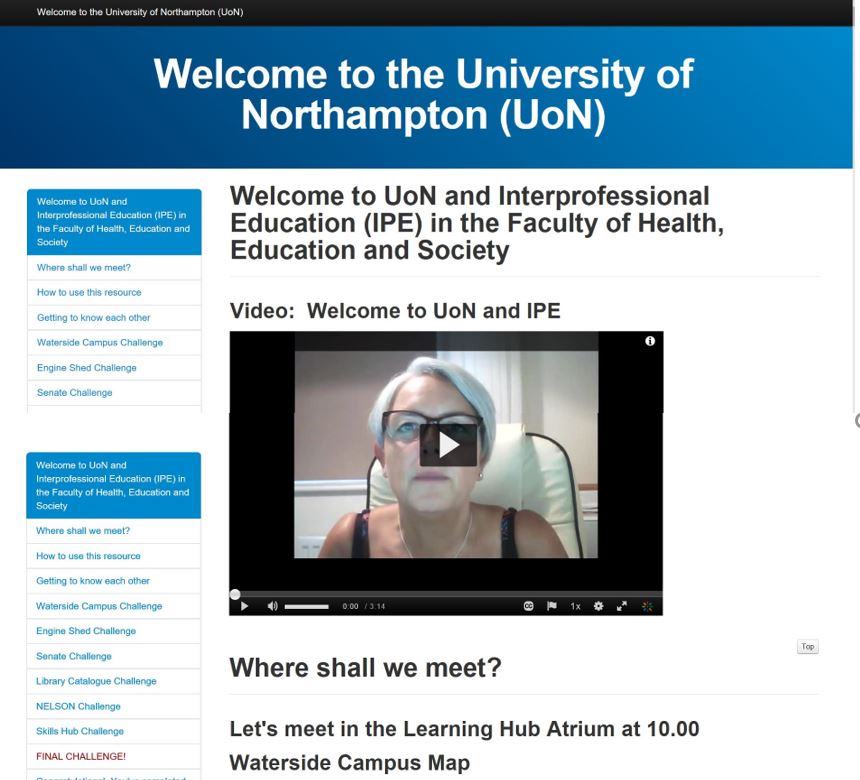
After a short walk-through I had a go at creating my xerte and found the process to be very straightforward (after a minor issue with formatting that Anne was quick to support me with). The end product looks professional and user-friendly – I’m delighted with it and look forward to hearing future students’ feedback on its accessibility. I aim to use Bootstrap xerte in the near future for creating a resource for anatomy and physiology and in the current climate can see it as an excellent platform for developing online resources that look professional and are easy to navigate for the student.
At least 1 in 5 people in the UK have a long term illness, impairment or disability. Gov.uk (2018). In the academic year 18/19, just under 1000 University of Northampton students were actively using ASSIST services. This does not include students who may be registered with the Mental Health service but not ASSIST, nor those who have chosen not to disclose. Making your materials more accessible can help people with:
- impaired vision
- motor difficulties
- cognitive impairments or learning disabilities
- deafness or impaired hearing
For any resources you provide to your students, whether online, printed, or displayed in class, it is your responsibility to ensure they are accessible. This blog post acts as an introduction for teaching staff who are unfamiliar with making accessible content. My top 5 tips include:
- Clear Colours.
- Logical Layout.
- Eliminate Expressions.
- Image information.
- Descriptive Details.
1. Clear Colours
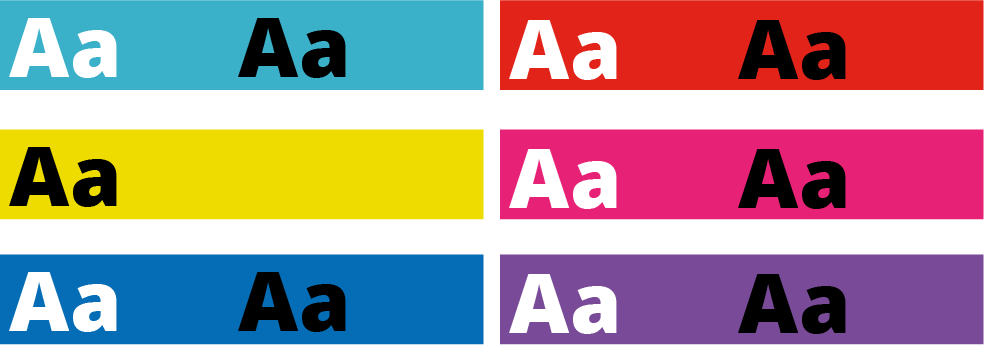
Accessibility standards specify a contrast ratio between text and background. The ratio can be lower when the text is larger. I would recommend only placing text on a strong colour for headlines or titles. I’ve included a link to a contrast checker at the bottom of the blog post.
When it comes to being able to read longer pieces of text easily, black text on white background seems to be accepted as the clearest combination. But for many people, such a stark contrast can make the text appear to skate about on the surface of the page. Using a very dark grey instead will help alleviate this. Some people find a pale coloured background really helps too. Ask your students if they prefer a pale blue or cream background colour behind text on your PowerPoint slides. Use Bold type to emphasise important words or phrases in the sentence, rather than using red. Finally, avoid placing text over an image, unless there is very clear contrast.
2. Logical Layout
This is one that will help most of your students. Make sure you describe things clearly and without ambiguity. For example, instead of putting a link to a journal article on NILE and write in brackets underneath, “you need to be logged into NELSON”; you should first explain how to log into NELSON. Obviously, this is just an example and third-year students can probably be expected to know how to log in to NELSON if they’ve done it before.
Another example is having content folders on NILE saying Week 1, Week 2, Week 3 etc. The folders are clear, consistent and not cluttered. Ensuring sites meet the NILE standards (see link below) means students have consistency across all the sites they use and can find what they need quickly and easily.
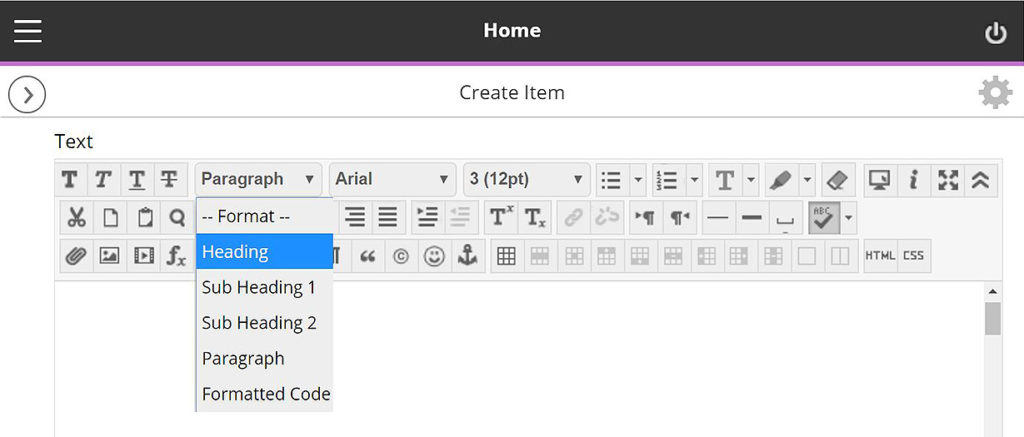
On NILE you can pick heading styles to help everyone using screen-readers. When you build a content Item, for example, there are options in the toolbar to let you change from Paragraph to Heading or Sub Headings. Use these instead of simply changing the size or making them bold. You can still change the size once you’ve set it to be heading/sub headings.
With larger pieces of text, the use of accurate, meaningful headings and subheadings can help students who feel overwhelmed by a sea of text and make it easier when people come back later on to find something. Learn more about how to use heading styles in the staff development training ‘Creating Accessible Online Content’. A link to more information about this is included at the end along with a download link to the ‘Designing for Diverse Learners’ posters, which explain all of this and more.
3. Eliminate Expressions

This is vital for the most important information and giving instructions. Following on from the previous step where we are making efforts to avoid ambiguity, the use of expressions or idioms can cause confusion or be completely undecipherable by others. Bear in mind, a lot of expressions taken literally word for word, make no sense at all.
Example 1:
“You will be assessed in just two weeks. It’s time to pull your socks up!”
I’m not sure how my socks relate to the assessment, much less the slouchiness
of them.
Example 2:
“You have been working really hard all year, don’t throw it all out the window now”.
Throw what out of the window? I wasn’t planning on throwing anything out of my window.
Example 3:
“You seem to have grasped the wrong end of the stick”.
What stick? I don’t remember any stick.
Similarly, avoid sarcasm and subtle exaggeration. Present information, clearly, simply and factually.
Besides certain groups of people taking them too literally, many expressions are becoming old-fashioned and you’ll find your younger students will have never heard them before. In these cases, they can identify that it is an expression and it shouldn’t be taken literally —but they still won’t know what it means.
Your challenge for the rest of the day is to make a mental note of every time you use an idiomatic expression. You might be surprised how much you do it.
4. Descriptive Details
Again, with giving instructions or perhaps announcements from your NILE site, make your expectations are clear, without making assumptions. For example, if you have students booked in for tutorials, make sure you tell them to arrive early, how long they have and what will happen if they turn up late.
They say a picture is worth a thousand words. I can’t help thinking this is a slight exaggeration. The key with this one is not to assume everyone will interpret the image in the same way. Just as you might teach your students to interpret data on a graph; when using images to convey information, make sure you explain what the picture is and what it’s there for. If you use a screenshot, for example, make sure we know what we’re looking at within the image. More importantly, don’t just put an image in place of any explanation.
Ideally, any images or charts should be there to enhance or add meaning to what you have said or written. In fact, most people benefit from something pictorial to illustrate the concept. However, if the image is there for purely decorative purposes, that’s fine and that brings us onto the number 5.
5. Image Information
In addition to people who won’t interpret an image the same way you do, there are those with visual impairments who can’t see the image at all. If you’ve followed the previous advice, you’ve already helped these people. However, there is standard practice for using images on the web, which are outlined in the Web Content Accessibility Guidelines (WCAG), see link below. When you upload an image to NILE, you will see two boxes just above the image preview. One says Image Description and the second one says Title. Give the image a relevant title and the description needs to contain the essential information. Think about why the image there, the information it presents, and then decide which words you can use to convey the same function and/or information. Leave the description blank if the image is for purely decorative. Get into the habit of doing this and it will become second nature. To help you with this, the Blackboard Ally tool has been applied to our NILE sites. You may have noticed a small gauge icon next to items you have uploaded. If you see a red/low gauge next to one of your images, click on it to find out how to improve its accessibility. Click the link at the end, to download Guidelines for Creating Accessible Word Documents. This is great resource for you to save a refer back to.
Caution: If you use an image that contains text, screen-readers will not be able to identify the words. Therefore, you must make sure any essential text from the image is also included as text. Try to select the text on the image below. You will see that you can because the text is not part of the image. In the previous images in this blog post, the text is part of the image.
Remember to book onto the staff development training session to learn how to make your Word docs and PowerPoints accessible too.
Find details on Unify in ‘staff development and training’.
Just 5 suggestions to help you support your students
In closing, please note I have deliberately avoided mentioning specific impairments, difficulties or disabilities in any of the sections. This is because I believe implementing each of these ideas can help all of your students, regardless of any additional needs. I strongly believe making accessible content should be about helping and supporting your students, not purely for the sake of meeting legislation.
It’s up to you to have an open dialogue with your particular students to find out ways in which you can support them. They do not have to disclose anything to you, and those who have declared something on their application probably won’t realise that information isn’t automatically passed onto their lecturers.
If you have content on Edublogs, please meet with your Learning Technologist before Sept 2020 for advice on making your Edublogs sites meet accessibility standards.
These were just my top 5 simple ways to get started, please leave a comment to let us know what tips and strategies you recommend. Thank you for reading and check out the links below if you want to learn more.
Further reading:
- JISC – UK law on accessibility
- GOV.UK – Understanding new accessibility requirements
- Creating content that works well with screenreaders
- WebAim – Contrast checker
- Designing for Diverse Learners. Posters
- AskUs – Editing Kaltura Captions
- AskUs – What is the new Ally accessibility tool in NILE?
- NILE Design standards 19/20
- Unify – Creating Accessible Online Content
Abbie Deeming, Senior Lecturer in Education, has been commended by students and external examiners for her assessment guidance and feedback, and use of marking rubrics. These rubrics meet the University’s requirement to mark to learning outcomes, and make the criteria used in marking clear to students, which is one of the questions that students are asked on the National Student Survey.

“By providing students with clear guidance and good quality, consistent feedback that is personalised and tailored to the individual and which includes links to helpful ‘feedforward’ resources, we are seeing an increase in students better reaching their potential. As a team, we are working to ensure that this excellent practice is represented throughout all modules in the Foundation Degree in Learning and Teaching (FDLT).”
Abbie Deeming
Feedback from Students
Regarding the use of rubrics on the FDLT programme, comments from students were very positive.
“I found the marking rubric very helpful to see how I met the criteria for each LO [Learning Outcome] and for what I need to be more careful with in the future.”
“The rubric is very clear and helpful. Being presented as a grid means it’s easy to read and can be used as a checklist when reading through assignments before submitting. The feedback is really detailed and helpful. I know now what I need to focus on to improve my next one!”
“I found the marking rubric very useful as it clearly outlines what needs to be covered within the assignment. I could also find the little fine details within the marking rubric too, even the formatting. The feedback I found very useful too. In fact I would like to email my appreciation. Overall the feedback was very good as it broke down everything that needs to be improved on, whilst also highlighting the excellent bits from the assignment. Although the feedback was “savage”, I understand it has to be to help us as writers improve. Thank you.”
“I thought that the feedback was very useful. I keep looking back at it then looking at my report to see what I can improve. It was very helpful and hopefully next time I improve. Many thanks.”
“The rubric gave me lots of confidence as I was able to easily see what my strengths were. Overall, I’m thrilled with the feedback. I’m under a lot of stress at the moment but I’m pleased I’ve still produced a good piece of work.”
Example
Below is a copy of the assessment guidance and the marking rubric, created for PDT1065: Pupil Engagement and Assessment. The purpose of the module is to engage students in studying the theory and practice of supporting learning, the assessment of learning and of learner needs, and principles of planning to advance learning. It also provides students with the opportunity to develop their own study skills. The assessment is a 3,250 word report, exploring both formative and summative assessment, reflecting on current practices within a setting and referring to relevant literature on the subject of assessment.
PDT1065 Assignment Brief and Rubric
Recommendations
- Firstly, determine what exactly are we looking for in this assignment, and how do we make this explicit.
- Break down the module learning outcomes against grading criteria to create a rubric which makes it clear what the assignment must look like to equal a pass, merit, or distinction.
- Communicate this clearly and consistently to students – they will be more likely to achieve better grades.
- Make the assessment guidance and criteria used in marking clear to students in the assignment brief
- Advise students to look at the distinction column of the rubric, and to make this into a ‘to do’ list.
- In taught sessions, help students make the connection between the session content and the learning outcomes.
- Following each session, suggest readings for students to look at in more depth to help strengthen their assignment.
- Arrange a tutor and learning development-led session on the theme of ‘understanding your assignment’.
- Ensure consistency across the module team, including partnering with associate lecturers to talk through the learning outcomes, and to explain the ethos behind the use of a marking rubric, i.e., clear guidance and consistency.
- You will find that marking to LOs helps the marking tutor as well, as there is clear guidance on where the mark falls.
- Overall comments should be positive, detailed, and helpful. Aim to give between two and four action points (feedforward), depending on the student and grade. At the next assignment, ask students to note how they have responded to these points.
- On the assignment post date, send an announcement via NILE, offering individual tutorials if clarification is needed on action points.
Feedback from External Examiner
Extract from Summer 2018 Report on PDT1065
Section A2: Measuring achievement, rigour and fairness:
- “Assessments are flexible and inclusive and allow for a range of different responses based on the students’ workplaces and experiences.”
- “Assessments are tightly and clearly linked to the learning outcomes.”
- “The quality and quantity of written feedback to the students is a major strength of this course. As I found last year, feedback is universally positive, detailed and helpful.”
“In talking to colleagues on the course, it is clear that they feel very strongly that this is an integral part of the process of teaching and supporting their students to the best of their ability.”
Further reading
- Dylan William (2009) Assessment for Learning: Why, what and how? Institute of Education
- John Hattie (2008) Visible Learning. Routledge
- Shirley Clarke (2008) Active Learning through Formative Assessment. Hodder Education
transparent
Pronunciation /trænˈspær.ənt/
1 see through
2 obvious; clear and easy to understand or recognize
3 open and honest, without secrets
Cambridge dictionary 2019
Transparent pedagogy is partly about making your intentions (your learning design) clear to the students. It’s partly about helping them to understand what to expect from you, and what is expected of them. It can be a great way of establishing responsibilities and partnership in the learning environment, and circumventing passive ‘consumer-style’ approaches to learning. But it’s also about developing metacognition, helping students think about how learning works, and how knowledge is constructed. Below are some examples that I think illustrate this approach really well.
This publicly-available Digital Sociology Syllabus by Prof Tressie McMillan Cottom is a great example, as it outlines the rationale behind her pedagogic choices, and openly prepares her students for the challenges of the chosen approach. I love how frankly she describes the requirements to her students – my favourite bit is this:
“Throughout the course, I expect you to engage each other’s work and the assigned reading substantively. We do not do that “leave a comment on a thread every week by five where you just write two sentences for a grade” nonsense in this course. This is not an independent study class with me or a MOOC. You should learn from each other as much, if not more than you learn from me.”
The syllabus is for an online course, which arguably makes clarity all the more important, but the idea can be applied across the board – in face to face and blended teaching.
Transparent pedagogy is also about exposing the process of learning, focusing on the journey rather than the ‘end goal’ and making it clear when and how learning is happening as the course progresses. The idea of palimpsests is used by Amy Collier to illustrate this process; I particularly like this part:
“Palimpsest can frame how we think about student learning–that it accrues and traces on individual students’ histories and humanities–what they already bring to the educational environment. We can recognize that students will build and connect learning across the time they engage with us and with our institutions. That’s why portfolios projects that focus solely on creating final products (something that can be shown to an employer) miss the point. Palimpsest in student portfolios would allow students’ previous work and thinking to color the “final product.””
This metaphor emphasises two key ideas for me. First, transparent pedagogy is about dialogue, not just a set of instructions or a brief. You can’t make a student learn in a particular way just by explaining your intention, but you can help them see how it’s intended to work, and give them the language to analyse it. They will bring their own understanding to what you are offering and combine these to create something new.
The second point is that it’s honest. Learning is messy, uncomfortable, and rarely linear. This article by Jake Wright makes a case for transparent pedagogy as an effective response to “naive skepticism” from new students, which he claims can derive from a number of sources including distress at the disturbance of a previously held world view. He describes his approach as “metadisciplinary discussion” which should be meaningful, accessible and reinforced throughout the course. Wright argues that this approach can help students in introductory courses move past simplistic views about right and wrong answers and handle multiple interpretations – not by confrontation, but by encouraging them to practice “thinking like a disciplinarian”.
Finally, transparent pedagogy is also really beneficial when it comes to sharing teaching experience. Whether for peer observation, team teaching or handing over a course to a new member of staff or partner, having an explicit and detailed explanation of the thinking behind the construction can make all the difference in terms of delivery and student experience.
If you’d like to get some ideas on how to try this, get in touch with the Learning Design team. Or alternatively, if you’re already doing this, let us know how it’s going! We’d love to know if it’s making a difference for you and your students.
When choosing a tool it is important to consider ‘What is the problem to which our NILE tools can be the answer?’
In this video professors Ale Armellini and Dr Ming Nie discuss the relationship between learning outcomes, aligned activities and NILE tool selection by considering the University’s pedagogic approach of Active Blended Learning (ABL).
For more info on how NILE tools can help your students learn using the University’s pedagogic approach of Active Blended Learning please enrol on the NILE training Enhancement Course here.
The NILE enhancement course covers:
- Discussion Boards
- Blogs and Journals
- Virtual Classrooms – Collaborate
- Videos – Kaltura
- Tests
- Self & Peer Assessments
Please note: you will need to login to the course with your standard NILE login details and self-enrol on the enhancement course.
Written by Dr. Jim Lusted, Learning Designer/Senior Lecturer in Sport Studies
In November 2017 I took up an 8 month secondment as a Learning Designer (LD) with the Learning Technology team. I had been a Senior Lecturer in Sport Studies at Northampton since 2009 and saw this as a great opportunity to try something new for a while. This blog gives you a flavour of my experience of the LD secondment, what I learned about working in professional services.
Why a Learning Designer secondment?
I was attracted to the secondment for three main reasons. First, I had really enjoyed working with the Learning Technology team as a lecturer and had valued their support – through things like CAIeRO course design workshops, ABL development sessions and helping me solve NILE problems. I felt I could fit quite nicely into their team and would enjoy working with them. Second, I had become more interested in teaching and learning practice – particularly as a result of the University’s shift towards ABL, and felt the secondment would be a great way to develop my own skills and knowledge in this area. Third, in my role as programme leader I had enjoyed mentoring new and less experienced colleagues, so I wanted to see what it would be like supporting staff in a more formal role. I must also admit that after 9 years of working in the same role I also fancied a change of scenery – I was eager to try something new.
“…I learned more about T&L practice in my LD role than I had probably done in my whole teaching career up to that point – I had the head space to think about my practice rather than just be chasing my tail teaching sessions every week.”
Written by Jim Lusted, Learning Designer
I recently attended a workshop hosted by Northampton Students’ Union (SU) and facilitated by the National Union of Students (NUS) where SU staff, academics and student representatives were introduced to a project called the ‘Greener Curriculum’. This is certainly a more catchy title than the more commonly used term Education for Sustainable Development – shortened to ESD – which represents an area of activity gaining increasing prominence across the HE sector.
What is sustainability?
At the start of the workshop we were asked to define ‘sustainability’. Most of us immediately came up with environmental issues  such as recycling, creating less waste, energy efficiency and so on, but we were also encouraged to consider the social and economic aspects of sustainability that we might not immediately recognise. This makes up what has been termed the ‘3 pillars’ of sustainability, or the ‘triple bottom line’ of people, planet and profit.
This holistic approach is reflected in the United Nations’ 17 Sustainable Development Goals that were adopted in 2015 to commit nation states to take action not only on high profile ‘green’ issues like climate change, but also concerns such as social equality, poverty, protecting life (human and non-human), and ensuring a quality education for all.
Education and sustainability
These are all unarguably worthy causes, but what role might universities play in promoting sustainability? The workshop asked us to consider this in relation to our own circumstances at Northampton. The NUS defines ESD as ‘education that aims to give students the knowledge and skills to live and work sustainably’, and their vision behind ESD is to ensure students leave higher education being part of the solution rather than the problem when it comes to tackling some of the big issues mentioned above.
The NUS have commissioned research that shows that two thirds of students want to have sustainability issues embedded into their programmes:
“Sustainable development is something universities should actively incorporate and promote.”
(NUS 2018)
Students want to engage with the big challenges of our times through their studies – be it environmental, social or economic – and they want to explore ways they positively influence the world around them.
Education for sustainable development @ University of Northampton
As the workshop progressed, many of the participants noted the apparent similarities between the guiding principles of ESD and the ideals that underpin Northampton’s status as an AshokaU ‘Changemaker’ campus. Indeed, one of the manifesto commitments of a Changemaker campus refers explicitly to sustainability:
“Operating in socially and environmentally conscious ways to model changemaking for students and other institutions and contribute to the vitality of people and the planet”
We felt that Northampton might be particularly well suited to embedding ESD into the curriculum when channelled explicitly through the Changemaker agenda. This academic year, as part of the UMF assessment review, all modules have been required to articulate revised learning outcomes, including some directly attributed to Changemaker values. This gives teaching staff a real chance to reflect on how they are embedding such values into their curriculum and where they are providing students with opportunities to explore some core principles of sustainability in their studies.
Embedding ESD in the curriculum – some ideas
We were given a number of useful resources and tips during the workshop to help consider how and where ESD could be embedded into teaching practice and curricula. Firstly, although some courses may be more aligned to ESD principles than others, like the social sciences (indeed, courses like Geography are likely to have sustainability as a core topic), we were encouraged to consider how every subject has the potential to include ESD perspectives. A really useful A-Z guide, called #sustainabilityAtoZ has been produced by the NUS to showcase examples across the breadth of academic disciplines where ESD has been embedded into programmes. Similarly, a website called www.dissertationsforgood.org.uk has recently been set up by the NUS as an attempt to try to bring together dissertation students with local and national organisations – with a view to creating dissertation topics and projects that can have a direct impact on the ‘real world’.
The future for ESD
It seems like many of the big issues facing the HE sector at the moment – debates about ‘value for money’, student satisfaction, graduate employment and so on – lend themselves to ESD being given ever higher profile in future higher education policy and curriculum design. Our workshop discussed several examples of universities across England who had undertaken big reviews of their own university wide curricula (much like our UMF review) to better align graduate attributes and skills more closely to ESD principles such as social responsibility and impact. With all this in mind, I expect we will be hearing much more about the idea of a ‘greener curriculum’. I personally really welcome the renewed interest developing a social conscience among students through their studies, and at Northampton in particular I see a real opportunity for us to creatively explore the ways in which ESD values can help bring the ‘Changemaker’ agenda into our teaching at the University.
Recent Posts
- Blackboard Upgrade – July 2025
- StudySmart 2 – Student Posters
- NILE Ultra Course Award Winners 2025
- Blackboard Upgrade – June 2025
- Learning Technology / NILE Community Group
- Blackboard Upgrade – May 2025
- Blackboard Upgrade – April 2025
- NILE Ultra Course Awards 2025 – Nominations are open!
- Blackboard Upgrade – March 2025
- Blackboard Upgrade – February 2025
Tags
ABL Practitioner Stories Academic Skills Accessibility Active Blended Learning (ABL) ADE AI Artificial Intelligence Assessment Design Assessment Tools Blackboard Blackboard Learn Blackboard Upgrade Blended Learning Blogs CAIeRO Collaborate Collaboration Distance Learning Feedback FHES Flipped Learning iNorthampton iPad Kaltura Learner Experience MALT Mobile Newsletter NILE NILE Ultra Outside the box Panopto Presentations Quality Reflection SHED Submitting and Grading Electronically (SaGE) Turnitin Ultra Ultra Upgrade Update Updates Video Waterside XerteArchives
Site Admin


