Posts by: jmusher
I want to change my programme structure…
I want to include a placement / work-based learning / a Changemaker challenge…
I want to use a particular assessment or technology…
I want to ensure an equivalent experience for students at other sites…
What do I need to do?
The Learning Design team have collated a document listing the most frequently asked questions from CAIeROs and consultations over the past two years, along with answers provided by the appropriate support teams. Hopefully the guidance here can help you identify the processes and teams that are in place to support you with a range of course design issues including quality assurance, assessment, distance learning and technology issues.
The list has been added to the Sharing Higher Education Design (S.H.E.D.) site on NILE. You can access the site at http://bit.ly/SHED-NILE, but you will need to be enrolled to view the document.
We’ll keep this document updated as new questions and answers come up. Want to submit a question that we haven’t covered? Just email it to the Learning Design team at LD@northampton.ac.uk.
In this video, Anne Segalini – Senior Lecturer in Occupational Therapy, talks through her module team’s approach to Team-Based Learning within Anatomy and Physiology at the University of Northampton.
The session is run within a standard 40 seater capacity room, where students use their own devices to login and access the Blackboard tests. With the readiness assurance tests completed, the students undertake application activities such as assembling a skeleton, or analysing joint and muscle activity through a series of body motions (e.g. putting on a jumper).
This leads to a break for lunch, with students returning to focus on a service user story, with either a guest speaker sharing their conditions and experiences of a particular service as part of their recovery, or a open access resources (such as http://www.healthtalk.org/) and apply “killer questions” related to the stories where students discuss and debate their group decisions over responses.
Click on the image below to watch the video

What is “blended learning”?
 “Blended learning” is an umbrella term, referring to learning activity that happens across contexts. The ‘blend’ is usually between learning activity happening inside and outside the classroom, or between learning that happens in real-world and online environments (or both!). Many of us learn in this way every day, informally – we might look up information in books and online, discuss it with peers over coffee and via email, draft new ideas on paper and on the laptop. As technology becomes ubiquitous, we need to be able to take advantage of both physical and virtual learning opportunities, to recognise the strengths and weaknesses of each, and to synthesise learning from different contexts. The challenge for educators is to design the right ‘blend’ of activity – both to support specific learning, and to help students to develop their independent learning skills for the future.
There are two key principles to remember if you’re new to blended learning. The first is to start with the right task for the learning, and then find the right tool (don’t choose a tool and then try to find a use for it!).
The second principle is the ‘blending’ part. The idea of this is that one type of learning activity supports and feeds into the other, and connections and transferability are clear.
Getting started with blended learning
You can ‘blend’ almost any kind of teaching, by starting to add in activities that help students bridge the learning they are doing inside and outside taught sessions. There is no ‘one size fits all’ approach, because each learning activity will depend on what you want to achieve. Starting small, with one type of activity or tool, can help you and your students build confidence and skills, and figure out what works well and what doesn’t. Here are some tips for designing learning activities online:
- Identify learning that can be done outside class time. Sometimes the best way to do this is to think about what you would really like to be able to do with your students in the classroom, and work backwards. Storyboarding can help with this.
- Design the right activity to support the learning. What should the student be doing in order to learn this? Who else should be involved? What resources will they need? Prompts like the Hybrid Learning Model cards can help you to frame different kinds of learning activities.
- Once you have a clear idea of what you want to happen, then choose the right tool to support this type of activity. The University provides a core set of tools that we have vetted for you. Beyond this there are hundreds of possibilities! All of these have strengths and weaknesses, but don’t worry, you don’t need to be a tech guru. The Learning Technology team can help with this.
 Many people begin by transferring a learning activity that they already know works well into the online environment. For example, if you would usually ask your students to discuss a contentious idea, or defend a position in a debate, you could do this in an online forum, or if you would usually demonstrate something for the students, you could do this using video. If you’re a little more confident, you might want to think of some ways that technology can extend your teaching and allow you to do things that you couldn’t do in a traditional face to face setting. You might use it to connect students to resources, peers or external experts. You might use it to provide visualisations of text-based materials, or to build knowledge checks that provide students with instant feedback, or to create spaces where they can pool their own resources and ideas to inform their work.
Tips for success
Be clear about the why and the how. Sometimes staff who try blended learning for the first time find that students don’t engage as they had hoped with the online activity. Student feedback tells us this is usually because either they don’t understand it, or they don’t see the value. When introducing online tasks, it helps to make it clear why they are being used, and how they will help students to achieve the learning outcomes. It’s also a good idea to explain any unfamiliar tools or processes in advance, just as you would when introducing a new task in the classroom. If you can, get a student perspective on your design before you launch it – and maybe try some online courses yourself, to see what it’s like on the other side!
Be realistic. Be aware that creating online resources and supporting online activity might require slightly different skills to the ones you use in the classroom, so allow yourself time to develop these. Think too about the ratio of effort to impact for your module – creating complex professional-looking resources requires a big investment of time in advance, although this may be worth it if there is one sticky concept that students really struggle with early in their studies. On the other hand, you may be able to get the same effect by using existing resources on that topic and asking students to critique them, or even by asking students to research the topic and share their own key resources. You don’t need to be a computer genius (or spend months learning complex software) to create that lightbulb moment!
Learn from others. Working in a team can really help here – not just in terms of sharing the workload and learning new skills, but also in setting consistent expectations for students across different modules on the same programme. If you’re stuck for ideas, have a look of some of our case studies, or ask around to see what colleagues are trying.
Do one thing
Ready to give it a try? If you want help figuring out what to blend, at a session, module or even programme level, the Learning Design team can help. If you already have an idea for an online activity, but you’re not sure about the technology, the Learning Technology team can help. Get in touch and we’ll help you get started!
At the end of the second day of CAIeRO, we hope you will feel like you’ve achieved a lot! But we know from experience that you will probably also feel like you have a lot still to do. This is why the last two stages of the CAIeRO process are important.
Action planning
 While all your ideas are fresh in your minds (and ideally while all your team are still together in the room), it’s a good idea to agree on an action plan for the work you didn’t manage to do during the CAIeRO. This might include completing the learning activities for the modules you’ve been working on, reviewing and aligning other modules on the programme, completing quality assurance processes such as change of approval, and further training or development for you and your team. If you have a deadline to complete the work, like a planned start date for a new course or module, start from there and work backwards to determine when you need to complete each step. It’s important to lay out all the steps you need to take, and to put dates and names against them so that you don’t lose momentum. Identify ‘owners’ for each task but also anyone who can help – there will always be other work to do, but shared deadlines can help to make sure you fit in what you’ve agreed to do.
At this point, while you have diaries to hand, you should schedule a follow up meeting to review progress. This will allow you to keep each other on track and keep the modules closely aligned, and it will also allow you to adjust if any changes come up in the meantime. Remember your Learning Designer and Learning Technologist are there to help you throughout the whole journey of design into delivery, and they will be keen to get feedback on what has (and has not) worked well for you and your team, as well as what works well with the students when you start to deliver the module(s). This helps us to get a clear idea of how much work is still to be done, and to schedule support accordingly, but also to shape our support and guidance for future CAIeROs.
Reflecting on CAIeRO
We hope that the CAIeRO process will help you build your course design skills, as well as building a better module. At each stage of the CAIeRO, your learning designer will try to make explicit the principles informing each task, and help you think about how to transfer the work you’re doing to other areas. If you have time at the end of the CAIeRO workshop, you might allow 15 minutes or so for reflection, and try to capture the discussions you’ve had and the reasons behind the changes and choices you’ve made. This will not only be useful when you come to deliver the module, but also when you are thinking about your own professional development as an educator.
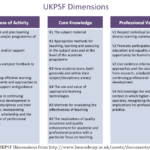
UKPSF - click to enlarge
We’d love to hear your reflections on the CAIeRO process, and any feedback that might help us improve. If you’d like to tell us about it, drop us an email at LD@northampton.ac.uk.
This is one in a series of posts about the CAIeRO process. To see the full list, go the original post: De-mystifying the CAIeRO.
Need a CAIeRO? Email the Learning Design team at LD@northampton.ac.uk.
Stage 3 of the CAIeRO process usually begins at the start of the second day. By this stage you should have your blueprint and storyboard finalised, and a clear vision of your new module design(s). The next step is to start making your ideas more concrete, by creating the learning and teaching activities that will support students to reach the learning outcomes.
 On your storyboard, you will have a number of placeholders along the learning journey where students need to learn particular things. Pick one of these to start with, and think about what kind of learning activities might help the students to get to grips with it. Is it a new concept or skill, where they will need some initial information or a demonstration from you (or someone else) to get started? Is it a complex idea or skill they will need some time to explore? Is there an opportunity to let them apply it, through experimentation or practice? Is it an area where they might benefit from sharing knowledge or experience, or being exposed to different perspectives through debate? You might find the Hybrid Learning Model cards helpful here, as they list verbs describing what the tutor and the student can do to support different types of learning.
Creating learning activities
This section of the workshop is sometimes thought of as the ‘e-tivity bit’, but it’s important not to think too much about the technology to start with. Think about the type of activity you think would work best. If you or your colleagues have taught that subject before, what worked well? Once you know what you’d like the students to be doing, then think about the context – is this something that needs to happen in the classroom or outside? Technology can add possibilities and allow us to design learning experiences that weren’t possible in the past – think about linking up live with an expert in the field, or providing your students with world-class open educational resources. It’s also important to make sure that your students are exposed to digital learning practices, and develop the skills they will need to keep learning beyond their degree. But online is not always the best mode for every activity, so if you have face to face time with your students, make sure you use it wisely!
To help you figure out the best context for each activity, it’s important to be aware of the strengths and weaknesses of the tools available to you. Your Learning Technologist can help you with this, and you may also be able to get advice from your colleagues on their experiences. Don’t be afraid to talk about things that haven’t worked well – it may be that there are new tools or skills that could help you tweak that activity so that it works better next time, and part of the aim of the CAIeRO is to develop your skills as well as your module!
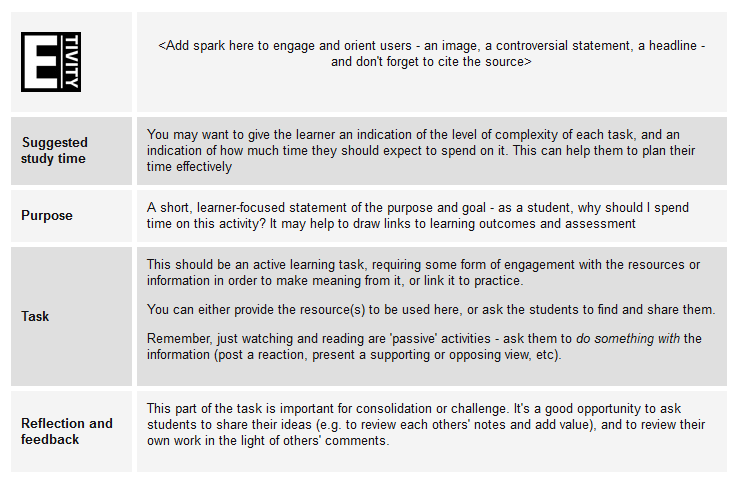
E-tivity template - click to enlarge
The reality check
 Once you have some learning activities created in NILE, it’s time to take a break while your reality checkers look them over. Reality checkers will ideally be students, but can also be colleagues, externals, anyone who has not been involved in the design of the module so far. Remember too that they don’t have to be in the room, they just need to be able to access the learning environment! The purpose of this stage of the workshop is to get an objective view of what you have created, and to provide constructive feedback to help you improve it. It’s important that you resist the urge to ‘help’ or ‘explain’ things to your reality checkers – remember when your real students come to this activity, they may not be able to call you and ask for clarification! Ideally your activity should stand by itself, with clear instructions allowing anyone who hasn’t seen it before to understand the purpose and how to complete it.
Your reality checkers will complete a feedback form that you can refer back to afterwards. You may also want to ask them to run through their thoughts on the activities, to get some more detail (if they are not in the room you could do this using Collaborate or Skype).
Review and adjust
Once your reality checkers have left, it’s a good idea to take a short amount of time to do some adjustments based on their feedback, while it’s fresh in your mind. Then you’re almost done!
This is one in a series of posts about the CAIeRO process. To see the full list, go the original post: De-mystifying the CAIeRO.
Need a CAIeRO? Email the Learning Design team at LD@northampton.ac.uk.
As part of the recent S.H.E.D. roadshow, we invited teaching staff to share their successful practice. The example below could be a useful approach for anyone looking to encourage their students to research and understand their subject, and to share that understanding with their peers.
In a third year module on Biodiversity and Conservation, Professor Jeff Ollerton asks his students to engage with a range of scientific writing published around the subject. This includes articles from peer-reviewed journals, UK Parliamentary briefings, scientific journalism, and more. In this part of the module, students are initially provided with recommended articles, and asked to read them critically, attending to the aims, message and methods, and considering whether the conclusions are justified. They then discuss their views in class, where their contributions are assessed using a rubric that is made available to all students in advance. The students are then asked to identify a paper of their choice and deliver a 5 minute verbal presentation to the class. The grade for this is combined with the contribution grade to make up 30% of the total module grade (other parts of the module are assessed using a report and a group debate).
These tasks not only help to ensure that students engage with research and develop their understanding, but they also build confidence and presentation skills. The attached Assessment Brief gives more detail about the assessment structure.
In this video, recorded as part of the S.H.E.D – Sharing Higher Education Designs, James Underwood (Principal Lecturer in Teachers’ CPD) demonstrates an essay planning technique useful at different levels and in different contexts.
This technique is discussed, as mentioned at the end of the video, in the following paper:
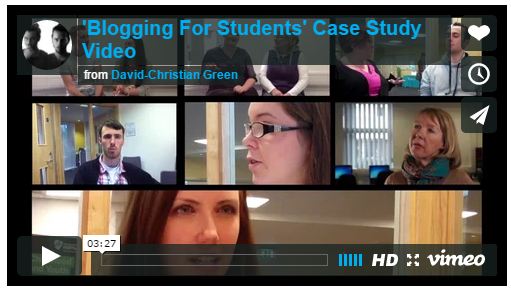
Teaching Students at University of Northampton, along with Helen Caldwell (Senior Lecturer in Education) describe how well and how effectively they feel blogging has become a way to record and assess their work.
A short film edited together for Northampton University School of Education.
To watch the video, please click the image below:
In this podcast, Jean Edwards (Senior Lecturer in Education) talks to Jim Harris (Learning Designer) about the module PDT3003 Educational Debates in Learning and Teaching, part of the BA Learning and Teaching, which includes assessed Online Debates using discussion boards in NILE
Please click below to listen to the podcast (duration: 07:32).

In this podcast, Jim Harris (Learning Designer) speaks to Jean Edwards (Senior Lecturer in Education) about the project which aims to investigate the use of mobile technologies in innovative assessment design and guidance, broadening the range of assessment practice to enhance tutors’ and students’ digital literacy.
The objectives of the project are:
- To map the current use of mobile technologies in assessment by staff and explore student perceptions.
- To explore and evaluate three case studies of digitally based assignments across the School of Education.
- To design a digital toolkit to support staff in devising assignments and assignment guidance.
Please click below to listen to the podcast (duration: 07:45).
To find out more about the project, please visit the project website by clicking here.
