Stage 3 of the CAIeRO process usually begins at the start of the second day. By this stage you should have your blueprint and storyboard finalised, and a clear vision of your new module design(s). The next step is to start making your ideas more concrete, by creating the learning and teaching activities that will support students to reach the learning outcomes.
 On your storyboard, you will have a number of placeholders along the learning journey where students need to learn particular things. Pick one of these to start with, and think about what kind of learning activities might help the students to get to grips with it. Is it a new concept or skill, where they will need some initial information or a demonstration from you (or someone else) to get started? Is it a complex idea or skill they will need some time to explore? Is there an opportunity to let them apply it, through experimentation or practice? Is it an area where they might benefit from sharing knowledge or experience, or being exposed to different perspectives through debate? You might find the Hybrid Learning Model cards helpful here, as they list verbs describing what the tutor and the student can do to support different types of learning.
Creating learning activities
This section of the workshop is sometimes thought of as the ‘e-tivity bit’, but it’s important not to think too much about the technology to start with. Think about the type of activity you think would work best. If you or your colleagues have taught that subject before, what worked well? Once you know what you’d like the students to be doing, then think about the context – is this something that needs to happen in the classroom or outside? Technology can add possibilities and allow us to design learning experiences that weren’t possible in the past – think about linking up live with an expert in the field, or providing your students with world-class open educational resources. It’s also important to make sure that your students are exposed to digital learning practices, and develop the skills they will need to keep learning beyond their degree. But online is not always the best mode for every activity, so if you have face to face time with your students, make sure you use it wisely!
To help you figure out the best context for each activity, it’s important to be aware of the strengths and weaknesses of the tools available to you. Your Learning Technologist can help you with this, and you may also be able to get advice from your colleagues on their experiences. Don’t be afraid to talk about things that haven’t worked well – it may be that there are new tools or skills that could help you tweak that activity so that it works better next time, and part of the aim of the CAIeRO is to develop your skills as well as your module!
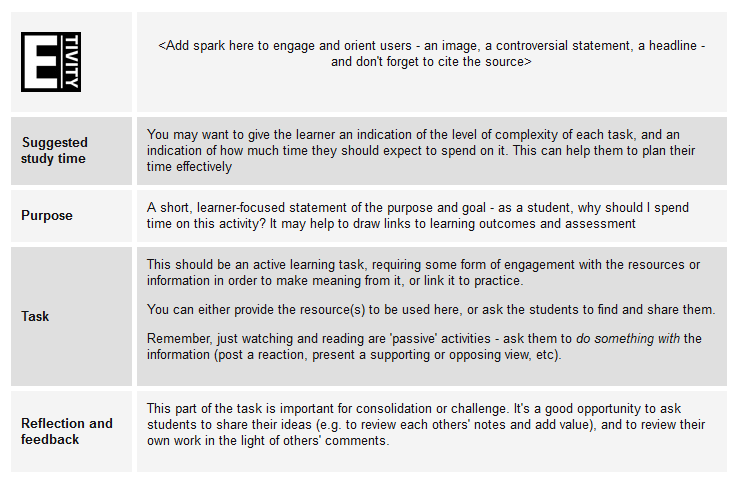
E-tivity template - click to enlarge
The reality check
 Once you have some learning activities created in NILE, it’s time to take a break while your reality checkers look them over. Reality checkers will ideally be students, but can also be colleagues, externals, anyone who has not been involved in the design of the module so far. Remember too that they don’t have to be in the room, they just need to be able to access the learning environment! The purpose of this stage of the workshop is to get an objective view of what you have created, and to provide constructive feedback to help you improve it. It’s important that you resist the urge to ‘help’ or ‘explain’ things to your reality checkers – remember when your real students come to this activity, they may not be able to call you and ask for clarification! Ideally your activity should stand by itself, with clear instructions allowing anyone who hasn’t seen it before to understand the purpose and how to complete it.
Your reality checkers will complete a feedback form that you can refer back to afterwards. You may also want to ask them to run through their thoughts on the activities, to get some more detail (if they are not in the room you could do this using Collaborate or Skype).
Review and adjust
Once your reality checkers have left, it’s a good idea to take a short amount of time to do some adjustments based on their feedback, while it’s fresh in your mind. Then you’re almost done!
This is one in a series of posts about the CAIeRO process. To see the full list, go the original post: De-mystifying the CAIeRO.
Need a CAIeRO? Email the Learning Design team at LD@northampton.ac.uk.
