Currently viewing the tag: "Demystifying the CAIeRO"
At the end of the second day of CAIeRO, we hope you will feel like you’ve achieved a lot! But we know from experience that you will probably also feel like you have a lot still to do. This is why the last two stages of the CAIeRO process are important.
Action planning
 While all your ideas are fresh in your minds (and ideally while all your team are still together in the room), it’s a good idea to agree on an action plan for the work you didn’t manage to do during the CAIeRO. This might include completing the learning activities for the modules you’ve been working on, reviewing and aligning other modules on the programme, completing quality assurance processes such as change of approval, and further training or development for you and your team. If you have a deadline to complete the work, like a planned start date for a new course or module, start from there and work backwards to determine when you need to complete each step. It’s important to lay out all the steps you need to take, and to put dates and names against them so that you don’t lose momentum. Identify ‘owners’ for each task but also anyone who can help – there will always be other work to do, but shared deadlines can help to make sure you fit in what you’ve agreed to do.
At this point, while you have diaries to hand, you should schedule a follow up meeting to review progress. This will allow you to keep each other on track and keep the modules closely aligned, and it will also allow you to adjust if any changes come up in the meantime. Remember your Learning Designer and Learning Technologist are there to help you throughout the whole journey of design into delivery, and they will be keen to get feedback on what has (and has not) worked well for you and your team, as well as what works well with the students when you start to deliver the module(s). This helps us to get a clear idea of how much work is still to be done, and to schedule support accordingly, but also to shape our support and guidance for future CAIeROs.
Reflecting on CAIeRO
We hope that the CAIeRO process will help you build your course design skills, as well as building a better module. At each stage of the CAIeRO, your learning designer will try to make explicit the principles informing each task, and help you think about how to transfer the work you’re doing to other areas. If you have time at the end of the CAIeRO workshop, you might allow 15 minutes or so for reflection, and try to capture the discussions you’ve had and the reasons behind the changes and choices you’ve made. This will not only be useful when you come to deliver the module, but also when you are thinking about your own professional development as an educator.
UKPSF - click to enlarge
We’d love to hear your reflections on the CAIeRO process, and any feedback that might help us improve. If you’d like to tell us about it, drop us an email at LD@northampton.ac.uk.
This is one in a series of posts about the CAIeRO process. To see the full list, go the original post: De-mystifying the CAIeRO.
Need a CAIeRO? Email the Learning Design team at LD@northampton.ac.uk.
Stage 3 of the CAIeRO process usually begins at the start of the second day. By this stage you should have your blueprint and storyboard finalised, and a clear vision of your new module design(s). The next step is to start making your ideas more concrete, by creating the learning and teaching activities that will support students to reach the learning outcomes.
 On your storyboard, you will have a number of placeholders along the learning journey where students need to learn particular things. Pick one of these to start with, and think about what kind of learning activities might help the students to get to grips with it. Is it a new concept or skill, where they will need some initial information or a demonstration from you (or someone else) to get started? Is it a complex idea or skill they will need some time to explore? Is there an opportunity to let them apply it, through experimentation or practice? Is it an area where they might benefit from sharing knowledge or experience, or being exposed to different perspectives through debate? You might find the Hybrid Learning Model cards helpful here, as they list verbs describing what the tutor and the student can do to support different types of learning.
Creating learning activities
This section of the workshop is sometimes thought of as the ‘e-tivity bit’, but it’s important not to think too much about the technology to start with. Think about the type of activity you think would work best. If you or your colleagues have taught that subject before, what worked well? Once you know what you’d like the students to be doing, then think about the context – is this something that needs to happen in the classroom or outside? Technology can add possibilities and allow us to design learning experiences that weren’t possible in the past – think about linking up live with an expert in the field, or providing your students with world-class open educational resources. It’s also important to make sure that your students are exposed to digital learning practices, and develop the skills they will need to keep learning beyond their degree. But online is not always the best mode for every activity, so if you have face to face time with your students, make sure you use it wisely!
To help you figure out the best context for each activity, it’s important to be aware of the strengths and weaknesses of the tools available to you. Your Learning Technologist can help you with this, and you may also be able to get advice from your colleagues on their experiences. Don’t be afraid to talk about things that haven’t worked well – it may be that there are new tools or skills that could help you tweak that activity so that it works better next time, and part of the aim of the CAIeRO is to develop your skills as well as your module!
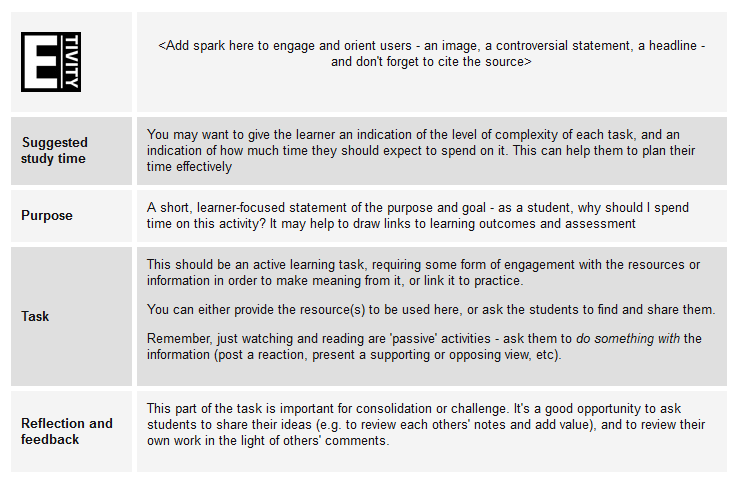
E-tivity template - click to enlarge
The reality check
 Once you have some learning activities created in NILE, it’s time to take a break while your reality checkers look them over. Reality checkers will ideally be students, but can also be colleagues, externals, anyone who has not been involved in the design of the module so far. Remember too that they don’t have to be in the room, they just need to be able to access the learning environment! The purpose of this stage of the workshop is to get an objective view of what you have created, and to provide constructive feedback to help you improve it. It’s important that you resist the urge to ‘help’ or ‘explain’ things to your reality checkers – remember when your real students come to this activity, they may not be able to call you and ask for clarification! Ideally your activity should stand by itself, with clear instructions allowing anyone who hasn’t seen it before to understand the purpose and how to complete it.
Your reality checkers will complete a feedback form that you can refer back to afterwards. You may also want to ask them to run through their thoughts on the activities, to get some more detail (if they are not in the room you could do this using Collaborate or Skype).
Review and adjust
Once your reality checkers have left, it’s a good idea to take a short amount of time to do some adjustments based on their feedback, while it’s fresh in your mind. Then you’re almost done!
This is one in a series of posts about the CAIeRO process. To see the full list, go the original post: De-mystifying the CAIeRO.
Need a CAIeRO? Email the Learning Design team at LD@northampton.ac.uk.
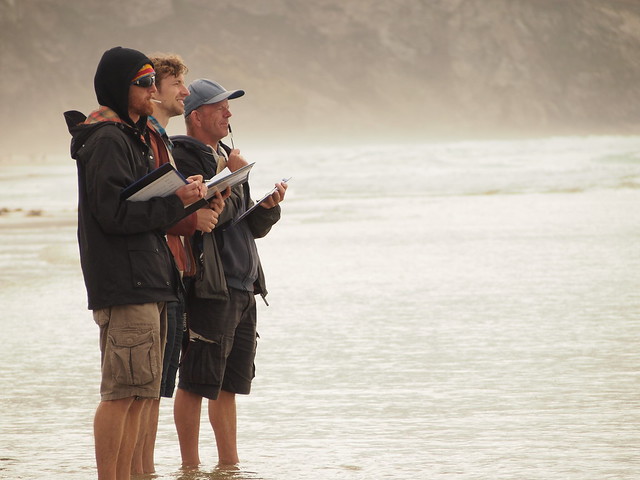
Bob has always taught his module using a traditional lecture-seminar format. He wants to bring in some new ideas, but doesn’t have much time to read up on pedagogic research. In the CAIeRO, he is teamed up with Joe and Laura. Joe is a new member of staff from a distance learning institution, who uses a lot of open educational resources to support his students in independent study. Laura leads another module on the programme, where she has been trialling peer teaching and problem based approaches. They spend some time discussing, sharing and planning. At the end of the session Bob’s storyboard for the module looks very different…*
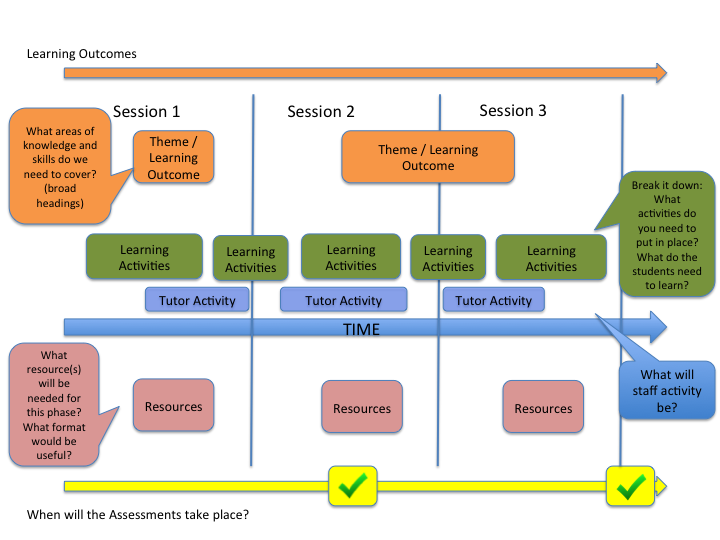
In the context of CAIeRO, a ‘storyboard’ is a visual plan of your module from beginning to end. Once you have the blueprint of the module agreed, the next step is to figure out how to deliver that in practice. This is sometimes the most challenging part of the CAIeRO process, but it can also be where the magic happens – where a new vision for the module starts to become a reality.
The main aims of the storyboarding task are around sequencing, alignment and coherence. These can be achieved through mapping out the themes, learning activities and assessment items – what students need to know, how they will learn it, and how they will show that they have learned it (that constructive alignment idea again!). The idea is to create a logical sequence of activity, or learning journey, that allows the learner to build knowledge, skills and understanding so that these can be demonstrated through assessment. We’ll then go on to consider in detail how that learning might happen, and what kinds of activities can be put in place to support it.
 You will be asked to note down all of the broad themes that students on the module will need to learn about – the big concepts, the core skills, everything they’ll need to learn to reach the outcomes you’ve written – and to put them in some sort of sequence. This is a fun activity involving lots of post-it notes and flip chart paper, allowing things to be moved around and re-arranged as needed. The trick with storyboarding is to approach it from the perspective of the learner. Resist the temptation to replicate the way you deliver the module now – in week 1 I do this, in week 2 I do this… Instead, ask yourself: if I were a student coming to this for the first time, what would I need to learn first?
Start adding your post-its to the timeline – they need to learn about this, they need to learn how to do that – start with broad headings, and then break these down in to more detailed subheadings (these will be your learning activities). While you’re doing this, it’s also helpful to note down any relevant learning resources you have created or found (texts, videos, even expert speakers!). We’ll need these in the next section of the workshop. You might find you have more learning activities specified for introductory level 4 modules, where students might benefit from having more structure, and less for modules that are more student-led or involve more independent study. That’s fine, but if you’re unsure, you can do a quick ‘sense check’ back to your look and feel cards. Did you specify how much guidance you thought was appropriate? Are you sticking to that, or has your thinking changed?
Once you have a rough sequence for the learning activities, place your summative assessment activities on the timeline (usually using a different colour post-it). Here are some more ‘sense checks’. Are you covering all of the knowledge and skills needed for that assessment before it happens? If not, you need to move things around – or reconsider what’s being assessed at that point. Don’t worry if your blueprint changes as a result of storyboarding. CAIeRO is a dynamic process and nothing is set in stone! You should also check at this point that your learning activities plan includes opportunities to learn the skills required for the assessment, and to try these out formatively.
Storyboarding - click to enlarge
There is no right answer to this question; it will vary according to the subject, level and cohort, and you will also have to consider the constraints of your own workload, timetabling and so on. The important thing is to plan contact time that will have the most impact for learning. You might have one aspect of the module that students find particularly difficult, and choose to spend a substantial amount of contact time at that point to make sure students can progress. You might have the first module in the first year of a programme, and decide that weekly clarification sessions are important to make sure students are on track. You might have a distance cohort on different time zones, and decide that the best support you can provide is in frequent monitoring of discussions or online ‘office hours’ sessions. Whatever you decide, the CAIeRO process will help you work through the options – and the final storyboard can be digitised as a useful visual to help students understand your chosen approach.
If you’re doing a standard two day CAIeRO, ideally you will have a (mostly) completed storyboard for your module by the end of day 1. It’s a good idea to pause and reflect at this point, but it’s also important not to lose momentum. Once your outline is finalised, the next step is to start creating the learning activities.
This is one in a series of posts about the CAIeRO process. To see the full list, go the original post: De-mystifying the CAIeRO.
Need a CAIeRO? Email the Learning Design team at LD@northampton.ac.uk.
*All characters are fictional representations. ‘Bob’ and ‘Laura’ were inspired by Alex Bruton’s post on the Flipped Academic – worth a read if you have a little more time to spare…
The first stage of a CAIeRO is all about outlining a vision for the programme or module – what is it for? what do you want it to do? – and then drafting this into something concrete to work on.
 For new programmes, refining the vision or idea is usually the logical place to start; defining the goals and the parameters, in discussion with colleagues on the course team, and with support from learning designers.
For existing programmes, this step may initially seem quite straightforward. A quick reference to the programme specification should tell us what we need to know. In practice though, programmes and modules get tweaked and adjusted over time, and for many programme teams it is rare to get the opportunity to spend time sharing ideas about the bigger picture of what should be taught, and how students might learn it. Stage 1 of the CAIeRO is your opportunity to revisit the aims of the programme and do a health check: asking is this still what we want to achieve? And if it is, then is this still clearly reflected in the modules that make up the programme?
As with all of the CAIeRO elements, you may spend more or less time on each task depending on the needs of your programme. That said though, it is always worth taking the time to ensure a shared vision before moving forward.
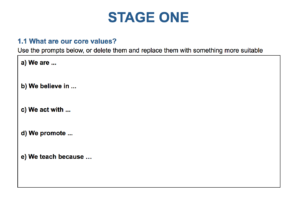
The mission statement
This first activity asks you to define, as a group and in a limited number of words, the ‘mission’ of the programme. This helps to ensure that everyone in the team is aiming for the same thing, so that we design a consistent experience for the learner. This step is particularly useful for programmes that combine modules from different areas of the discipline, and it allows those leading different modules to share their perspectives and experience. Reaching consensus can sometimes be tricky, but it does make everything that comes afterwards much easier! Once you have this, you can create statements for each of your modules, that align with and develop the mission for your programme.
 The ‘look and feel’
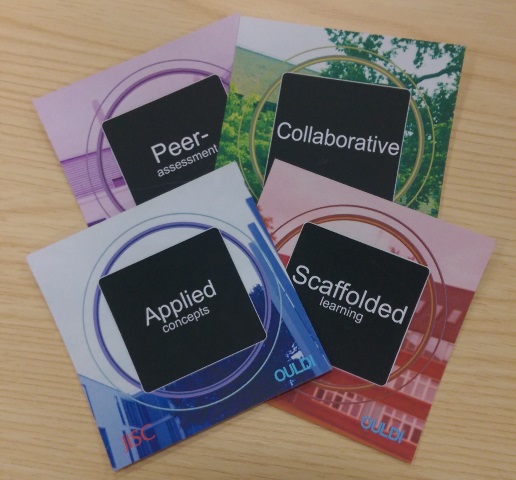
This stage of the workshop uses Course Features cards, designed by the Open University Learning Design Initiative. You’ll be asked to narrow down the features to those which are most important to the ‘look and feel’ of your course. This may sound a little ‘woolly’, but it’s an easy umbrella term for the different elements that need to be considered (pedagogic approach, guidance and support, content, interaction and so on).
As with the mission statement, this activity helps the team to work towards a consensus on the type of learning experience you want to create. But there are also other gains to this process, that sometimes go unnoticed:
- It provides a common language to help you and your colleagues talk about how you like to teach – particularly for those teaching strategies that are based on tacit experience. Choosing these stimulates discussion about them: what do you mean by …? how does that work? why is that the best approach? This discussion is useful for skill sharing and personal development, as well as narrowing down the most effective approaches for the context.
- It brings the learners into the heart of the conversation, as choices need to be made about what learning approaches they might use, and what kinds of support they might need.
- It helps to ensure that you are considering all the elements that make up a balanced course.
Constructive alignment and backwards design
 The next three sections or tasks ask you to focus in on the module level, though you will need to keep the programme-level outcomes and assessment map in the back of your mind to ensure alignment. We’ll look at the building blocks that form the basis of each module: the learning outcomes, assessment tasks and learning activities. We’ll be looking to flesh out the initial vision into a more structured pathway that is constructively aligned, asking: how do we define the learning in terms of demonstrable outcomes? how do we design assessment opportunities that allow the learner to demonstrate achievement of those outcomes? how do we create learning activities that support the learner to reach the intended outcomes and succeed in the assessment? For this we often use a ‘backwards design‘ approach, beginning with what we want the learner to know and be able to do at the end of the module, and working backwards.
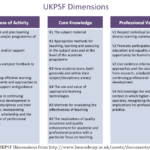
First in this sequence are the outcomes (what the student should ‘come out with’, or should know or be able to do). These are arguably the most important element of a module, and not (only) because they are required for quality assurance and benchmarking! Outcomes define the parameters of what will be covered, and help the student to understand what’s expected and what will be assessed. We will check the outcomes for each module against three key criteria: language, academic level, and relation to assessment.
Assessment activities will be chosen or reviewed to ensure validity: what’s the best way for a student to demonstrate these outcomes? We’ll also consider how to prepare the students for the assessment (in terms of process as well as content), and how to incorporate peer and self-assessment.
Finally, we’ll begin to consider what kind of learning and teaching will be needed to support the students in achieving the outcomes. We’ll cover this in more depth in the next section.
A note on paperwork: Any design change to a module needs to work within the relevant quality assurance framework. If you’re working on learning outcomes or assessments, these may already be written in your module specification, and making changes to these could require a change of approval. When designing learning activities, you’ll also need to consider the allocation of teaching, learning and assessment hours that currently make up the workload for that module (200 hours for a 20 credit module). Don’t let QA requirements stop you improving things – your Learning Designer or Embedded Quality Officer can help you to understand the requirements for any suggested changes.
This is one in a series of posts about the CAIeRO process. To see the full list, go the original post: De-mystifying the CAIeRO.
Need a CAIeRO? Email the Learning Design team at LD@northampton.ac.uk.
 CAIeRO workshops are a time-intensive activity, requiring two full days from every member of the team to be most effective. With this in mind, it’s really worth taking the time in advance to agree what the team wants to achieve in that time. The person running the CAIeRO will be a trained facilitator or Learning Designer, and they will always request a pre-CAIeRO meeting, with at least the programme and module leaders but ideally with the whole team.
In the pre-CAIeRO meeting we will cover a range of topics including:
- Background to the programme. We’ll need an idea of what the course is about, who the tutors are, who the learners are, mode of delivery etc.
- Why do you need a CAIeRO? We’ll discuss any goals or challenges identified by the programme team that need to be addressed, and also any upcoming QA processes (validation, PSR) that need to be considered.
- What do you know about CAIeRO? We’ll give you an overview of what you can expect, what’s expected of you, and the deliverables.
- What skills and resources do we have available? We’ll review what experience the team has of course design, of teaching on the course, of delivering in the chosen mode, of using NILE etc.
- Who (else) needs to be there? We need at least all the staff on the teaching team. This means those who lead and teach on the modules under review, and ideally also those who teach the other modules in that year or programme. This helps promote a consistent experience from the student perspective, and also allows the shared vision and skills developed to be disseminated to other modules where appropriate. We will also need at least one ‘reality checker’ from outside the team (more on that later). But in order to get the design right, we might also want input from other stakeholders… Students? Academic Librarian? Learning Technologist? Embedded Quality Officer? CfAP? Critical friend? External Examiner? Employer?
- Logistics. When* and where? You’ll need a room with a screen, and with tables for laying out flip chart paper. And although fun, CAIeRO can also be hard work, so don’t forget the coffee and biscuits!
Once we have all the details worked out, your Learning Designer will create a CAIeRO planner document and send out the link to it. This is a working document that we will be using throughout the process. Before the CAIeRO itself, the team can use this document to record their aims for the module, reflections on student feedback, and any ideas or resources they want to include on the day.
*Note: the two days that make up a CAIeRO do not need to be consecutive. There are benefits to keeping the two days together to maintain momentum, but it can also be helpful to leave time in between for reflection, depending on how the team works best. It is important though to put both days in the diary at the beginning. Leaving the second day to be arranged later risks leaving the work half done, despite the best of intentions…
This is one in a series of posts about the CAIeRO process. To see the full list, go the original post: De-mystifying the CAIeRO.
Need a CAIeRO? Email the Learning Design team at LD@northampton.ac.uk.
“I keep hearing about this CAIeRO thing, but I don’t really know what it is…”
 CAIeRO stands for “Creating Aligned Interactive educational Resource Opportunities”. If you’re wondering, yes, there is a theme here. The acronym was chosen (although not by me) to align with the Northampton Integrated Learning Environment (NILE).
So what does it actually mean? Think of it as a Course Design Retreat – a full module CAIeRO is two days away from the phone and the email, to build or re-design taught modules, with support from a range of specialist staff. Every CAIeRO will be different, but broadly speaking the workshop has two aims – to develop the modules themselves, and to help the teaching team to develop their course design skills.
This is the first in a series of blog posts examining the different elements of the CAIeRO course design process. The series will cover all of the key interactions, from the pre-CAIeRO meeting through to follow up activities. It will discuss the tools and techniques used in CAIeRO, and their role in course design.
I hope these posts will provide an insight into the process for those that are new to CAIeRO, as well as a reminder for those who have participated in or facilitated sessions. CAIeRO is a work in progress, and we’d love to hear about your experiences, so please feel free to add your own comments, insights and suggestions.
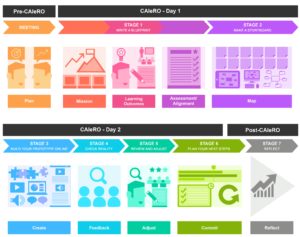 Links to the posts will be added below as they are published. You can also click on the image to see a visual overview of the CAIeRO process.
De-mystifying the CAIeRO:
- The pre-CAIeRO meeting
- Programme level CAIeRO
- CAIeRO Stage 1: The blueprint
- CAIeRO Stage 2: The storyboard
- CAIeRO Stages 3-5, let’s get building!
- CAIeRO Stages 6 and 7, planning and reflecting
Need a CAIeRO? Email the Learning Design team at LD@northampton.ac.uk.
For more information about the development of the CAIeRO methodology, research into the use of CAIeRO, and guidance on how to become a facilitator, see the Introduction to CAIeRO page on our ILT website.
A typical module CAIeRO will often start with programme level exercises, such as agreeing or reviewing the mission, ‘look and feel’, and learning outcomes for the programme as a whole. It’s in the interests of the teaching team – and the students – to (re-)use these elements of the programme’s blueprint when designing at module level – it helps to promote coherence and consistency, and to minimise unintentional duplication. But focusing on the module level, while necessary for planning and supporting good learning, can sometimes lead to a fragmented approach over time. Sometimes you need to take a step back to see the bigger picture.
The Learning Design team are often asked to support teams who need to review and make changes at the programme level. As with module CAIeROs, the reasons for this can be many and varied: maybe it’s a new programme or pathway; maybe there have been significant changes in staffing or in the subject area; maybe the team want to respond to specific institutional agendas or to challenges identified in student feedback or grades; maybe it’s just been a long time since the programme was reviewed as a whole and the team want to ensure that iterative changes at the module level haven’t affected the coherence of the award map. Programme level CAIeROs can be as diverse and bespoke as module level ones, but there are some common goals, and as a team we are always refining our toolkit to support them. You may find you use some of the steps below more or less depending on your needs, but this post, along with the Programme Planner developed by our very own Rob Farmer, will give you an idea of some of the approaches available to you.
Before you start: (Re)establishing consensus
View the full Programme CAIeRO Planner
The programme ‘blueprint’
As always we suggest you start by defining the intended outcomes, if you don’t have these already. Although programme outcomes are slightly different to module outcomes, because they are not directly assessed, many of the same principles still apply. They need to be aligned with national quality standards (e.g. the FHEQ and Subject Benchmark Statements), and with any relevant Professional, Statutory and Regulatory Body (PSRB) requirements if the programme is accredited – and of course they have to make sense to non-experts, including students and employers. Once you have your programme outcomes, you can start thinking about breaking them down into chunks of learning that will form your taught modules – or, for existing programmes, reviewing how well they map to the modules you already have in place. Do you need to add, remove, combine or split anything?
Sequencing learning
 Taking a programme level perspective allows you to plan the development of understanding and skills across a larger timeframe, to make sure that the scaffold is sound and your students aren’t missing a foundation piece when they reach the higher levels. To get the sequence right, you can storyboard your programme using a range of tools, from paper and post-its to Powerpoint or Popplet. Move the pieces around until the order seems logical, and think about whether each piece needs to be ‘short and fat’ (intensive) or ‘long and thin’. At this stage you might want to consider the placement of elements that are more complicated to schedule, like placements and trips, as well as those over which you have no control, like holidays and closed days.
Mapping assessment and feedback
It can be really useful to overlay your assessments on to your programme storyboard, to give you an idea of the mix of assessment activity and also to identify any deadline and marking ‘bottlenecks’. Programme leaders will usually collate details of the summative assessments across a programme, because this information is required for processes like validation, but we would encourage you to do this for your formative assessment opportunities too. This will allow you to easily see the turnaround time and where students will receive their feedback – and to identify whether it is timely enough to be useful for the next summative task! If you don’t know yet how your modules will be assessed, make a note to come back to this step, or keep a ‘work in progress’ version that you can update with more detail as you go on.
Key skills and ChANGE skills
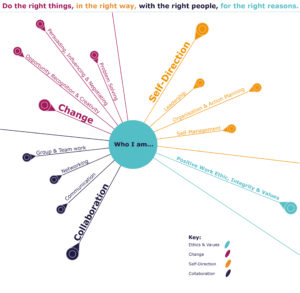
Find out more about the ChANGE skills
Programme design can be a complex business – and this is before you even get in to the details of the individual modules! We recommend that teams who have a lot to do at the programme level leave at least a full day for this type of work, before moving on to the module level CAIeROs.
This is one in a series of posts about the CAIeRO process. To see the full list, go the original post: De-mystifying the CAIeRO.
Need a CAIeRO? Email the Learning Design team at LD@northampton.ac.uk.
