 Another major marking season will soon be upon us and being prepared before the event can prevent avoidable stress for students and markers.
LearnTech are offering 90 minute SaGE refresher training courses in March and April, with an option for subject/division groups to review their own second marking and external examiner procedures afterwards.
Sessions are on 23 and 31 March (2-4), 21 (2-4) and 24 April (10-12). If you are part of a subject group in your school who want to use the review option, please book into the same session.
Booking is at:
https://www.eventbrite.co.uk/e/making-your-mark-count-a-sage-refresher-tickets-16118479807
 Although some mapping applications are included as part of the NILE External Resources blog, more detailed use cases have been assembled in this Xerte learning unit to guide you through some possible applications of free mapping and associated software. This includes creating overlays, plotting images, exploring historic imagery, creating tours and crowd sourcing geographic data. Most tools allow the created content to be shared to viewers who will not need to register in any way.
Many of these use cases could be applied to collaborative student projects or research tasks which relate to specific geographic areas, though the requirement for registration of an editing tool will restrict their use as part of a summative assessment.
We hope to grow and improve this resources, so if you have any use case examples or other applications we would be very pleased to include them. Since this original post was made, we have added CartoDB as another resource.

Our colleagues at CfAP are often on the receiving end of poor assessment design. In this post, Kate Coulson, Head of CfAP, describes the impact on the student experience and looks at ways to ensure this won’t happen to your students…
“Maya* is an undergraduate in the second year of her degree. Throughout her first year, she was averaging a C grade in her assessments. Maya has just received her grade and feedback from her first assessment of her second year. She was given a D grade and the marking tutor advised her to visit CfAP to get some support and guidance in “understanding the question”.
When Maya meets with a CfAP Tutor she becomes very distressed and states that “the question didn’t make sense” and “I don’t know what I needed to include”. She also states that she spoke to her tutor directly as she was unclear about the assessment but their conversation left her more confused. When chatting to her course mates about the assessment, they had interpreted the requirements in a totally different way and she panicked and didn’t know what to do.”
When writing questions for essays or assignments it is imperative that you think about the student. Badly written essay questions confuse the student and can affect their confidence and performance in the task – sometimes even leading them to question whether University is the right place for them.
Tips to help you avoid the pitfalls:
- Allow time to plan your questions or tasks.
- Be clear about what knowledge and skills you want the students to demonstrate (these should be informed by your learning outcomes).
- When you are writing a question or task, consider the stage of the programme and module where it takes place, and evaluate whether the students have the content knowledge and the skills necessary to respond adequately.
- When scheduling, be aware of other assessments students will be given from other modules on the programme. Nobody benefits from students having to divide their time and energy between multiple deadlines.
- Discuss the assessment with your students – both the task itself and the purpose of it. Explaining why you have chosen this task, and how it will help them to reach the learning outcomes, will help them feel ownership. Be prepared to adjust in response to valid feedback.
- Share grading criteria and rubrics ahead of the assessment. Students should know what they are aiming for, and what satisfactory performance looks like. Better still, consider writing a model answer. This will help you to reflect on the clarity of the essay question, even if you choose not to share it with the students until after the deadline. It could also serve to inform the grading of students’ responses.
- Use your colleagues to critically review the question or task, the model answer and the intended learning outcomes for alignment.
- Use formative tasks to help students to develop their understanding of expectations and standards. Better still, plan out the ‘assessment journey’ when planning your module, to ensure students have opportunities to learn the process as well as the content of the assessment. The Assessment and Feedback cards from the JISC Viewpoints project can help you do this.
Writing good essay questions is a process that requires time and practice. Review your questions after the students have completed them, think about how the questions have been interpreted. Studying the student responses can help evaluate students’ understanding and the effectiveness of the question for next time.
Useful reading and resources:
The University’s Assessment and Feedback Portal provides more information about assessment design, including links to published research in this area.
The Assessment Brief Design project from Oxford Brookes gives detailed guidance on writing clear and targeted briefs.
For more on the great work done by the Centre for Achievement and Performance, visit the CfAP tab on NILE.
*”Maya” is a fictional character, although her story is based on real events.

Access the Panopto training session (44 minutes)
Busy staff often complain – with justification – that training isn’t available when they need it. Learntech are always looking for better ways to make training easier to access and, as part of our improvements for 2015, are starting to introduce ‘pop-up training’ options. These are sessions on topics suggested by small groups of staff who are able to spare around an hour at a time on a date to suit themselves. Once we have been able to arrange a trainer and the resources, we will offer more places to other members of staff through School managers and the staff Facebook group. This will be at relatively short notice – maybe as little as a week – but we hope that this option will prove popular.
Panopto was the subject of our first full session – requested by three members of staff, we actually saw 12 staff attend and have created an online resource for staff unable to attend as a result. You can access the Panopto training session here, with a Podcast version available if your browser or device has difficulty displaying that content. Producing a Panopto recording of a Panopto recording is a bit more complicated than just creating a Panopto recording, but the attendees got a lot out of the session and were contemplating some novel uses. The ability to collectively share notes between students and instructors was a feature many thought should be more widely used.
If you have any similar training needs and can arrange for at least two staff members to attend, we will be delighted to do something similar for you. Contact your School Learning Technologist or mail us at learntech@northampton.ac.uk with your requirements, numbers and possible dates.
Dr Estelle Tarry outlines the development of the URICA Undergraduate Journal, which publishes selected undergraduate dissertations from the Faculty of Education & Humanities.
View the full case study here (PDF, 542KB)
Visit the journal website here: http://bit.ly/URICA
Dr Terry Tudor, Senior Lecturer in Waste Management, introduced structured online learning activities (e-tivities) into his Masters modules after attending a CAIeRO for individuals course development workshop. Read the case study to see how these activities have helped to link his distance learning students with his learners on campus – and also helped them to improve their writing skills.
![]() Clear signposting for learners is really important but getting a consistent style to a site or learning unit can be difficult. Google have released 750 icons as a Creative Commons Attribution (CC-BY) resource that provides a large number of formats and sizes. You can download it from https://github.com/google/material-design-icons/releases – this is a big file though, over 50MB.
Clear signposting for learners is really important but getting a consistent style to a site or learning unit can be difficult. Google have released 750 icons as a Creative Commons Attribution (CC-BY) resource that provides a large number of formats and sizes. You can download it from https://github.com/google/material-design-icons/releases – this is a big file though, over 50MB.
Although font format is missing from this package, Sergey Kupletsky has created one that you can use if you prefer that approach (most modern professional web sites use this method nowadays).
The combination of all these formats should mean that it is relatively easy to create websites, learning units and even printed material that follows the same design.
(First published in the Nile External resources site)
The report for this year’s mobile survey has now been published where we look at the way that mobile devices, apps and interactions are used and carried out at Northampton. There were 322 respondents who took the opportunity to let us know their thoughts on the University’s mobile provision and any developments that they would like to see.
The report provides a brief summary of the main findings of the survey, including an overview of technology ownership among staff and students, trends in mobile use, facilities on campus (WiFi etc), and feedback on the iNorthampton app (which you can find in the App Store, Play Store and on the web).
You can read the report here: Mobile Survey report 2014/15 (PDF, 1024KB)
Karl Flowers, Senior Lecturer, Institute for Creative Leather Technology assesses his students through presentations and has often found that it is difficult to schedule face-to-face time slots where all the required parties can make it. Allowing his students to independently record their presentations and submit them through NILE’s video streaming tool, Kaltura, overcomes scheduling issues, enables more use of technology for the students and enables sharing good practice between year groups.
CC-BY-NC 2.0 licensed image by Derek Bruff
One of the more discussed topics at the University of Northampton at present is the idea of the ‘flipped classroom’ or of students engaging in ‘flipped learning’. A major reason why this is being discussed now is that use of the flipped classroom could well be a major feature of the University’s new Waterside campus1, however this is not the only (nor even the best) reason for interest in this subject. As will undoubtedly be clear, the best reason for adopting a flipped learning approach to teaching and learning is that it offers pedagogical advantages, and we will certainly look at some of the evidence in favour of flipped learning in a later blog post. However, our purpose in this post is simply to outline what flipped learning is, and how one might go about doing it.
The key points in this post are:
1. Very simply put, the flipped classroom is one where students access content and engage in activities designed to develop their understanding before class, and then use the class time to discuss and engage in depth with issues, ideas and questions arising from the pre-class content and activities.
2. Whilst there may be some barriers to adopting this approach, most (if not all) can be overcome.
3. The flipped classroom is very relevant to the University of Northampton at the moment as it is one of the models of teaching and learning which will work very well in the new Waterside campus. However, there’s no need to wait until we get to Waterside to try it out, as it’s something that will work well right now.
4. There is a lot of support available to staff wanting to try out the flipped classroom, and staff are encouraged to try out this approach to teaching and learning.
What the flipped classroom is
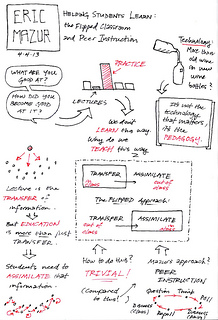
I was introduced to the idea of flipped learning in 2012 by the Harvard Professor Eric Mazur, when I attended his keynote speech2 at the annual conference of the Association for Learning Technology. The idea of the flipped classroom owes a great deal to the work of Mazur, whose ideas about peer instruction3 formulated at Harvard in the 1990s evolved into what we now term flipped learning. To use Mazur’s terminology, what happens in a traditional classroom is that class time is typically taken up with ‘knowledge transfer’, often a lecture, and students then complete tasks outside of class in order to process and understand the subject matter, which Mazur terms ‘knowledge assimilation’. What Mazur proposed is that the knowledge transfer stage should be covered prior to attending class, and that the class time could then be used to help students assimilate what they had read or watched prior to coming to class. The ‘flip’ is simply that knowledge transfer now happens outside class, and knowledge assimilation now happens in class.
“Mazur’s reinvention of the course drops the lecture model and deeply engages students in the learning/teaching endeavor. It starts from his view of education as a two-step process: information transfer, and then making sense of and assimilating that information. ‘In the standard approach, the emphasis in class is on the first, and the second is left to the student on his or her own, outside of the classroom,’ he says. ‘If you think about this rationally, you have to flip that, and put the first one outside the classroom, and the second inside. So I began to ask my students to read my lecture notes before class, and then tell me what questions they have [ordinarily, using the course’s website], and when we meet, we discuss those questions.'” 4
Putting the flipped classroom into practice
Obviously no classes at Northampton are taught only via lectures, and I suspect that very few (if any) lectures at Northampton are pure didactic monologues, but Mazur’s ideas could still be used to good effect to free up more class time to spend with students helping them to understand the material and the subject in more depth.
If this approach appeals to you, then an example of how you could put it into practice is by putting your lectures online, and using your class time to engage students in activities and tasks which will help them to fully understand the material which was covered in your lecture. The online lectures should be short, certainly no more than thirty minutes, but two fifteen minute lectures would be preferable. And supporting the video lectures will probably be some reading, a book chapter or journal article perhaps. Students may watch your lectures a few times in order to get the most from them, and students for whom English is not a first language may benefit greatly from the ability to watch and re-watch the lectures. You’ve now freed up an extra hour to spend with your students, so what’s the best way to use that hour?
Well, there are plenty of options here. If you’d prefer a more teacher-led session then one idea would be to ask your students to complete a pre-class test or survey in order to find out where the gaps in their understanding are. Perhaps you’d prefer to give them a test so that you can check their understanding yourself, or perhaps you’d prefer the students to determine for themselves what they did and did not understand, so you ask students to submit questions about the material. Their questions or their test results could then form the basis of a class session in which you discuss and answer the questions that the students submitted in the survey, or provide further clarification on the things they got wrong in the tests. This approach is often called ‘just in time teaching’ as you don’t really know what you need to cover in class until the test or survey results have been submitted, and this is often less than 24 hours before the class is due to start. If you’d prefer something more student-led then you could still use a pre-class test or survey, but this time you take the students questions (or develop your own questions based around the things they got wrong in the tests) and get the students to answer their questions themselves. This is the approach that Mazur uses, which he terms peer instruction.
“Mazur begins a class with a student-sourced question, then asks students to think the problem through and commit to an answer, which each records using a handheld device (smartphones work fine), and which a central computer statistically compiles, without displaying the overall tally. If between 30 and 70 percent of the class gets the correct answer (Mazur seeks controversy), he moves on to peer instruction. Students find a neighbor with a different answer and make a case for their own response. Each tries to convince the other. During the ensuing chaos, Mazur circulates through the room, eavesdropping on the conversations. He listens especially to incorrect reasoning, so ‘I can re-sensitize myself to the difficulties beginning learners face.’ After two or three minutes, the students vote again, and typically the percentage of correct answers dramatically improves. Then the cycle repeats.” 5
Other options could involve a blend of just in time teaching and peer instruction. These are not the only approaches though, and whilst there is no one correct way of doing things, it’s probably safe to say that an approach which sees the students actively engaged in class is likely to lead to them learning more than an approach in which the students are passive. A visual idea of how the flipped classroom could work in practice is given below:

An Approach to the Flipped Classroom - click image to view full size
Waterside – a flipped campus?
Can you flip a whole institution? Yes, you can. Clintondale High School in Michigan started flipping its classes in 2010, and now delivers all classes using the flipped model. They claim that this approach has led to dramatic reductions in both failure rates and discipline problems6. The University of Technology, Sydney, has developed a teaching and learning strategy which fits extremely well with flipped classrooms7, and has set up its own Flipped Learning Action Group to promote the use of this approach8. Does this mean that Waterside going to be a flipped campus? No, it doesn’t. Whilst we won’t have any lecture theatres, and while much of the teaching and learning will happen in smaller teaching spaces (twenty to forty students), a one-size-fits-all approach would not be the best option for the new campus. Nevertheless, what is encouraged for Waterside is what is encouraged at both Park and Avenue campuses here and now, which is participatory, student-led teaching and learning and the use of both class time and technology to engage students in active, exciting and transformative learning experiences.
Will students complain if I flip my classroom?
Possibly. Students may expect lectures and they may think that they learn from them. Students may also like lectures because they’re easy: not much is expected from attendees at lectures as they are “the teaching moment that most promotes passivity and discourages participation.”9 If you adopt a flipped learning approach then students will have to work harder both in class and before class. This is a good thing, and if you want to counter objections from students who want you to lecture you could refer them to bell hooks’ essay quoted above, ‘To Lecture or Not’10, where she tell us that “When we as a culture begin to be serious about teaching and learning, the large lecture will no longer occupy the prominent space that it has held for years.” You could also refer them to Graham Gibbs’ article, ‘Twenty terrible reasons for lecturing’11, in which he explains and provides evidence as to why lecturing does not “give students a rich and rewarding educational experience.”12 In addition, the recent National Union of Students’ publication ‘Radical Innovations in Teaching and Learning’ is worth referring students to as it asked universities to, amongst other things, consider what place the lecture has in “a modern, democratic university.”13
Support for flipping your classroom
What support is available to academics wanting to try out flipped learning? Well, an excellent place to start is with the Learning Designers and the Learning Technology Team. The Learning Designers will be able to explain more about flipped learning, and will be able to help you successfully plan and implement flipped classroom sessions. And the Learning Technology Team will be able to provide you with training and support regarding the technologies that you may want to use as part of your flipped classroom sessions.
To end, it’s worth pointing out that changing the way one teaches takes time, and without support from professional services staff, colleagues and managers, change is not likely to happen. Change, especially radical change, also needs failure to be acknowledged as a possible and legitimate outcome, as not every new technique that we try out will be a success. However, perhaps the flipped classroom offers a low-risk opportunity for change, as there is plenty of training and support available from the Learning Designers and the Learning Technology Team, and the evidence, which we will look at in a later posting, seems to suggest that this is an approach that works.
Contacts
Learning Designers: LD@northampton.ac.uk
Learning Technology Team: LearnTech@northampton.ac.uk
References
1. Parr, C. (2014) ‘Six trends in campus design: 5. Informal, flexible learning spaces.’ Times Higher Education Supplement. December 2014. [online]. Available from: http://www.timeshighereducation.co.uk/features/six-trends-in-campus-design/4/2017412.article
2. Mazur, E. (2012) ‘The scientific approach to teaching: research as a basis for course design.’ YouTube. [online]. Available from: https://www.youtube.com/watch?v=aYiI2Hvg5LE
3. Lambert, C. (2012) ‘Twilight of the Lecture.’ Harvard Magazine. March/April 2012. [online]. Available from: http://harvardmagazine.com/2012/03/twilight-of-the-lecture
4. Ibid.
5. Ibid.
6. See: Clintondale High School (2012) Our Story. [online]. Available from: http://flippedhighschool.com/ourstory.php
7. UTS (2104) ‘Learning 2014 Strategy.’ YouTube. [online]. Available from: https://www.youtube.com/watch?v=rL0eFmac7mA
8. UTS (2014) ‘Flipped Futures.’ UTS Newsroom. August 2014. [online]. Available from: http://newsroom.uts.edu.au/news/2014/08/flipped-futures
9. hooks, b. (2010) Teaching Critical Thinking: Practical Wisdom. Abingdon: Routledge. p.64.
10. Ibid. pp.63-68.
11. Gibbs, G. (1981) Twenty terrible reasons for lecturing. SCED Occasional Paper No. 8, Birmingham. 1981. [online]. Available from: http://shop.brookes.ac.uk/browse/extra_info.asp?compid=1&modid=1&deptid=47&catid=227&prodid=1174
12. Ibid.
13. NUS (2014) Radical Interventions in Teaching and Learning. [online]. Available from: http://www.nusconnect.org.uk/resources/open/highereducation/Radical-Interventions-in-Teaching-and-Learning/
