Please note: this post is focused on iOS (Apple) devices, as the nature of this operating system can make transfer of files more difficult than it is on other platforms, e.g. Android. That’s not to say though that you couldn’t also use WebDAV with an Android device.
What is WebDAV?
WebDAV (or Web Distributed Authoring and Versioning) is a technology that allows you read and write access to a shared folder on a server. Basically, it means that you can download files, read them, change them and upload them again (although it can also do lots of other clever things with files too).
Using WebDAV with staff shared (Novell) drives
Ever wondered how you can get to the files on your shared drive via your iPad? Here’s how.
- Get the WebDAV Nav app. It’s free.
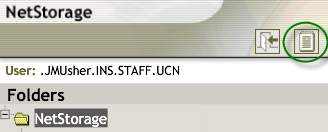
- In your iPad browser (probably Safari), go to http://www.northampton.ac.uk/netstorage. Log in.
 Tap on the little notepad icon, next to the logout (open door) button. The web address (URL) of the page you are viewing will change slightly.
- Select and copy the URL.
- Go into the WebDAV Nav app, and click the ‘plus’ icon at the top right of the screen.
- Give the location a name, e.g. ‘School Shared Drive’, and paste in the URL in the Server URL field. Add in your username and password. On the next screen you should see your shared drive folders.
Ok, so you now you can get at the files you had stored there. But what if you want to upload something?
 Well, lots of apps have a ‘Send to WebDAV’ option built in. In Pages, for example, when you have a document open you can go to ‘Share and Print’ in the settings (top right), and choose ‘Copy to WebDAV’. The iWork apps (Pages, Numbers, Keynote) will transfer these files directly for you. The first time you do this, you will need to enter the server information, exactly as you did above. After that, this information will be stored for you (unless you choose to Sign Out each time).
Some other apps, like iAnnotate for PDF, will give you an ‘Open In’ option, but then don’t allow you to enter the server address within the app. In this case, the upload is a two part process. Choosing the WebDAV option from the sharing menu here will copy the file to local storage on the iPad.
 You then need to go back to the WebDAV Nav app, navigate to the folder where you want to upload the file, and then click the hard drive icon at the bottom right of the screen to pick up the file and upload it.
Using WebDAV with NILE
 It’s also possible to use WebDAV to upload files from your iPad into NILE. If you have the iNorthampton and/or Blackboard Mobile Learn apps, you will already know that you can add new text-based content items in to module sites (as long as you have instructor access). However, on Apple devices, the ‘Attachments’ button currently only allows you to pick up image files, from the camera or photo library. WebDAV will allow you to get different types of files in to NILE from your iPad, although you may still need to do some fine tuning on how you present these files to students, using a standard web browser (from a desktop or laptop computer). Here’s how.
In your module site on NILE, go to the Control Panel and click on the double right arrow button next to the ‘Files’ heading. You should see the file storage area for that site, where all of the attached files are kept. At the top right, click on the ‘Setup Web Folder’ button.

Copy the Web address that is highlighted on the next screen – you can use this as you did with the server address details in the steps above. Any files uploaded using this link will appear in the Files area of this course on NILE. Unfortunately this doesn’t let you display the files in a content area for the students to view, but it does mean that the file is transferred into NILE ready to be used. When you log in from your desktop or laptop, you can create an item, and choose the file from the course Files area.

Hints and tips for using WebDAV with NILE:
Each module will have its own URL. If you’re using the WebDAV Nav app to upload files, you might want to set up each of your NILE sites, so that you can add files into the right courses. However if the files you are uploading are mostly from iWork apps, which transfer files directly, then you may prefer to choose one module on NILE that you want to use as a storage point for uploads, to save you having to sign out and re-enter a different URL every time you want to upload something to a different course. Once the file is in NILE, you can create the content item or link in that course, and then use the ‘Move’ function (from the dropdown menu) to pick which module site you want to move it to.
