Bob has always taught his module using a traditional lecture-seminar format. He wants to bring in some new ideas, but doesn’t have much time to read up on pedagogic research. In the CAIeRO, he is teamed up with Joe and Laura. Joe is a new member of staff from a distance learning institution, who uses a lot of open educational resources to support his students in independent study. Laura leads another module on the programme, where she has been trialling peer teaching and problem based approaches. They spend some time discussing, sharing and planning. At the end of the session Bob’s storyboard for the module looks very different…*
In the context of CAIeRO, a ‘storyboard’ is a visual plan of your module from beginning to end. Once you have the blueprint of the module agreed, the next step is to figure out how to deliver that in practice. This is sometimes the most challenging part of the CAIeRO process, but it can also be where the magic happens – where a new vision for the module starts to become a reality.
The main aims of the storyboarding task are around sequencing, alignment and coherence. These can be achieved through mapping out the themes, learning activities and assessment items – what students need to know, how they will learn it, and how they will show that they have learned it (that constructive alignment idea again!). The idea is to create a logical sequence of activity, or learning journey, that allows the learner to build knowledge, skills and understanding so that these can be demonstrated through assessment. We’ll then go on to consider in detail how that learning might happen, and what kinds of activities can be put in place to support it.
 You will be asked to note down all of the broad themes that students on the module will need to learn about – the big concepts, the core skills, everything they’ll need to learn to reach the outcomes you’ve written – and to put them in some sort of sequence. This is a fun activity involving lots of post-it notes and flip chart paper, allowing things to be moved around and re-arranged as needed. The trick with storyboarding is to approach it from the perspective of the learner. Resist the temptation to replicate the way you deliver the module now – in week 1 I do this, in week 2 I do this… Instead, ask yourself: if I were a student coming to this for the first time, what would I need to learn first?
Start adding your post-its to the timeline – they need to learn about this, they need to learn how to do that – start with broad headings, and then break these down in to more detailed subheadings (these will be your learning activities). While you’re doing this, it’s also helpful to note down any relevant learning resources you have created or found (texts, videos, even expert speakers!). We’ll need these in the next section of the workshop. You might find you have more learning activities specified for introductory level 4 modules, where students might benefit from having more structure, and less for modules that are more student-led or involve more independent study. That’s fine, but if you’re unsure, you can do a quick ‘sense check’ back to your look and feel cards. Did you specify how much guidance you thought was appropriate? Are you sticking to that, or has your thinking changed?
Once you have a rough sequence for the learning activities, place your summative assessment activities on the timeline (usually using a different colour post-it). Here are some more ‘sense checks’. Are you covering all of the knowledge and skills needed for that assessment before it happens? If not, you need to move things around – or reconsider what’s being assessed at that point. Don’t worry if your blueprint changes as a result of storyboarding. CAIeRO is a dynamic process and nothing is set in stone! You should also check at this point that your learning activities plan includes opportunities to learn the skills required for the assessment, and to try these out formatively.
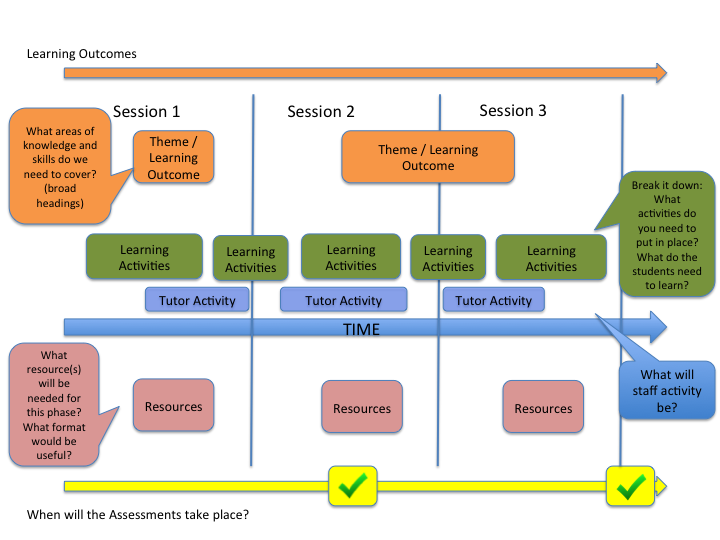
Storyboarding - click to enlarge
There is no right answer to this question; it will vary according to the subject, level and cohort, and you will also have to consider the constraints of your own workload, timetabling and so on. The important thing is to plan contact time that will have the most impact for learning. You might have one aspect of the module that students find particularly difficult, and choose to spend a substantial amount of contact time at that point to make sure students can progress. You might have the first module in the first year of a programme, and decide that weekly clarification sessions are important to make sure students are on track. You might have a distance cohort on different time zones, and decide that the best support you can provide is in frequent monitoring of discussions or online ‘office hours’ sessions. Whatever you decide, the CAIeRO process will help you work through the options – and the final storyboard can be digitised as a useful visual to help students understand your chosen approach.
If you’re doing a standard two day CAIeRO, ideally you will have a (mostly) completed storyboard for your module by the end of day 1. It’s a good idea to pause and reflect at this point, but it’s also important not to lose momentum. Once your outline is finalised, the next step is to start creating the learning activities.
This is one in a series of posts about the CAIeRO process. To see the full list, go the original post: De-mystifying the CAIeRO.
Need a CAIeRO? Email the Learning Design team at LD@northampton.ac.uk.
*All characters are fictional representations. ‘Bob’ and ‘Laura’ were inspired by Alex Bruton’s post on the Flipped Academic – worth a read if you have a little more time to spare…
